How to Check and Replace Your Car Cabin Air Filter
My Smelly First Experience
I remember the day perfectly. The summer heat was absolutely brutal. Sweat dripped down my face as I got into my car. All I wanted was a freezing cold breeze. I turned the air conditioning fan to the highest setting. A pathetic puff of warm air hit my face. It smelled exactly like wet gym shoes.
My wife rolled down her window immediately. We both laughed at the terrible smell. That day was my first real lesson in car maintenance. I had no idea this hidden part even existed. My assumption was that the engine air filter was the only one. Boy, was I wrong. This small mistake cost me a lot of comfort. It also put extra strain on my car HVAC system. I want to save you from that same smelly mistake.
What Does a Cabin Air Filter Actually Do?
Think of this part as a mask for your car. It sits hidden behind your dashboard. As you drive, your car pulls outside air inside. This air is full of road dirt. Pollen from trees floats in it too. Harsh smoke from large trucks is also there.
The filter catches all this bad stuff. It stops the dirt from reaching your lungs. Clean air makes the car smell fresh. Replacing it takes just a few minutes. You do not need any special skills.
Why You Should Not Ignore It
A clean filter helps your fan motor run well. The blower motor pushes air through your vents. A dirty filter blocks this air path. The motor has to work much harder. It can easily burn out over time. Buying a new blower motor is very expensive. Buying a simple paper filter is incredibly cheap. I learned this lesson the hard way. Now, I check my own filter regularly.
Signs You Need a New Cabin Air Filter
You do not need a mechanic to tell you when it is time. Your car will give you very clear signs. You just need to pay close attention. I ignored the warning signs for months. Do not repeat my mistake.
Smell and Airflow Issues
The most obvious sign is a bad odor. Turn on your fan to the maximum speed. Close your eyes and take a deep breath. Does it smell stale or moldy? That means dust is trapped in the paper pleats.
Another clear sign is weak airflow. I noticed my air conditioner was struggling to cool the cabin. The fan sounded very loud. However, barely any air was coming out of the dash vents. The clogged dirt acted like a brick wall. It blocked the cold air from reaching me.
Strange Noises and Dust
Listen closely to your front dashboard. Do you hear a high whistling sound? This happens when air squeezes through a dirty slot. A struggling motor can also make a whining noise.
Look at your dashboard surface right now. Are you constantly wiping away thick dust? A bad filter lets debris pass right through the vents. I used to clean my interior every single week. The dust kept coming back instantly. Once I changed the part, the dust problem stopped. It was a huge relief.
Choosing the Right Replacement Filter
When you go to the auto parts store, you have choices. The shelf will have several different boxes. I felt very confused the first time I saw them. You generally have two main options to pick from.
Standard Paper vs Charcoal Filters
The first option is a standard paper filter. This is the cheapest choice available. It does a great job catching dust and bugs.
The second option is an activated charcoal filter. This type costs a little bit more money. However, it contains a special layer of carbon. That dark layer absorbs bad smells and exhaust gases. I always choose the charcoal version now. Driving behind a smelly garbage truck is no longer a problem. The charcoal traps those harsh fumes instantly. Spending five extra dollars is definitely worth it.
Dealership Costs vs DIY Savings
I called my local car shop to ask about a replacement. The service desk quoted me seventy dollars. Hearing that high price shocked me. The part itself costs less than twenty dollars. You are paying mostly for their labor time.
The job takes less than ten minutes to do. You do not need a degree in mechanics to finish this. I decided to keep my hard earned money. Driving to the store to buy the part was easy. Here is a quick breakdown of what you can save.
| Repair Method | Cost of Parts | Cost of Labor | Total Cost |
| Dealership Service | $20 to $30 | $40 to $60 | $60 to $90 |
| Doing It Yourself | $15 to $25 | $0 | $15 to $25 |
Tools You Need for the Job
This is my favorite part of the whole process. You barely need any tools at all. For most modern cars, you need absolutely nothing. Your bare hands are the only tools required.
Certain older models might use a few small screws. A simple Phillips screwdriver is enough in that case. I also recommend keeping a bright flashlight handy. It gets very dark under the passenger dashboard. A small car vacuum is very helpful too. Dead leaves and bugs often get stuck in the tray. You want to suck those up before installing the new part. Finally, grab a damp wash cloth. You can wipe away any loose surface dust.
Step by Step Guide to Replacing the Filter
Now we get to the really fun part. I will walk you through exactly what I do. This simple process works for most vehicles on the road today. Doing this task in my driveway is relaxing. You can do it anywhere you park.
Step 1: Empty the Glove Box
Open your glove box door right now. What do you see inside? Mine was completely full of old gas receipts. Three pairs of broken sunglasses sat in the corner. There were also sticky napkins from a fast food drive-thru.
Take everything out of the box. You must empty the compartment completely. If you skip this step, everything will fall out later. I made this silly mistake the first time. Picking up scattered papers off the floor mats took five minutes. Save yourself the headache. Put all those items on the front passenger seat.
Step 2: Lower the Glove Box Safely
Look at the outside edges of the open door. You will usually see a small plastic arm on the side. We call this piece the dampener. It stops the heavy door from falling too fast.
Gently unclip this small arm from its plastic peg. After that, push the left and right sides of the box inward. You are trying to squeeze the plastic past the dashboard frame. The box will suddenly swing down toward the floor mats. Do not panic when this happens. You did not break your car. It is supposed to drop down like that.
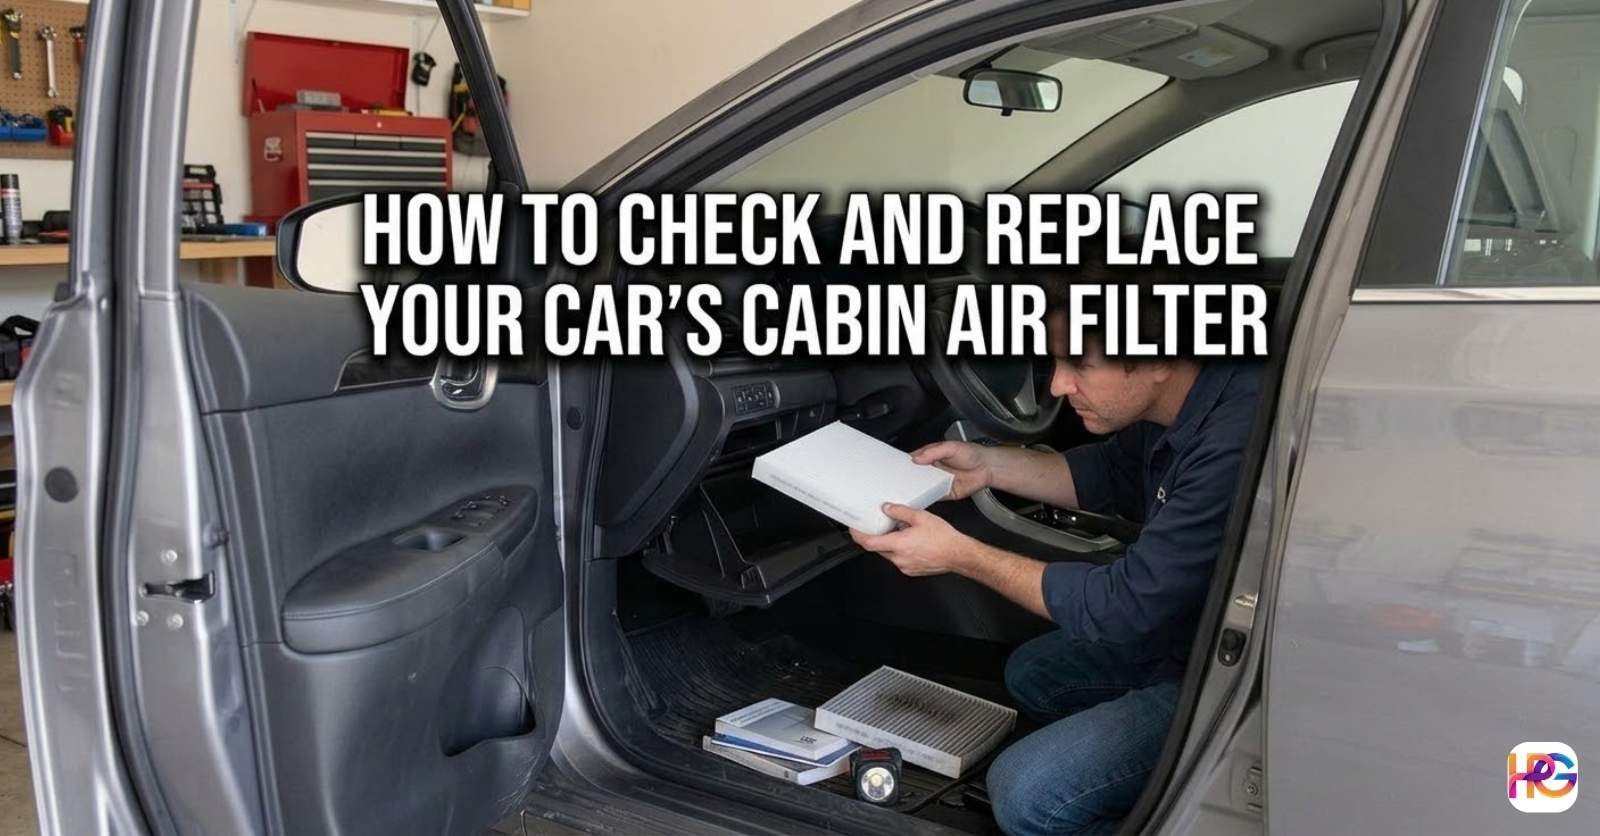
Step 3: Remove the Old Filter
Look directly into the empty dark space behind the dash. You will see a long rectangular plastic cover. We call this piece the housing door. It usually has simple release clips on the left and right ends.
Pinch those side clips with your fingers. Next, pull the cover straight toward your chest. It should pop right off with ease. Now you can clearly see the edge of the old dirty filter. Grab it and pull it out very slowly. Be extremely careful here. Mine was covered in dry leaves and dead spiders. Pulling too fast makes that junk fall into the blower fan. Notice the printed arrows on the side of the filter. They show the correct direction of airflow. Remember which way they point.
Step 4: Clean the Housing Area
This is where your handy vacuum comes into play. Take a close look inside the empty plastic slot. You will probably see some loose dirt clumps. My habit is to stick the vacuum hose right in there.
I suck up all the hidden debris quickly. This step ensures the new filter sits perfectly flat. A clean housing also stops weird smells from returning. Take your damp cloth and wipe the plastic edges. A little extra cleaning effort goes a very long way.
Step 5: Install the New Filter
Take your brand new filter out of its cardboard box. Look for the airflow arrows printed on the side paper. This specific step is the most crucial part.
The new arrows must point in the exact same direction as the old ones. Usually, this means they point straight down toward the floor. Slide the clean filter directly into the empty slot. It should glide in easily without force. Do not push hard if it gets stuck. You might have it turned sideways. Take it out and try again. It needs to sit snug and perfectly flush.
Step 6: Put Everything Back Together
Grab the plastic housing door again. Snap it back into place over the newly installed filter. You should hear a very clear clicking noise. That click tells you it is fully secure.
Lift the heavy glove box back up. Squeeze the sides inward once again. Push the plastic sides past the dashboard frame stoppers. Reattach the small dampener arm onto its original peg. Finally, put all your napkins and receipts back inside. Close the door firmly. You are officially done with the job. Turn on your car and test the cold air. You will instantly feel a massive difference. The air will smell clean. The flow will feel incredibly strong.
How Often Should You Change It?
Everyone asks me about the best replacement schedule. The true answer depends entirely on where you drive. Car makers usually say to change it every fifteen thousand miles. Sometimes they suggest waiting twenty thousand miles.
My thought is those numbers are just basic guidelines. I live in a very dusty area. Dirt roads are a regular part of my daily commute. Because of this harsh environment, I change mine much sooner. If you live in a big city with heavy smog, you need frequent changes too. Spring tree pollen is another massive factor. Here is a simple guide I use to plan my replacements.
| Driving Condition | When to Replace the Filter |
| Normal City Driving | Every 15,000 miles |
| Dusty Dirt Roads | Every 10,000 miles |
| Heavy Smog Areas | Every 12,000 miles |
Common Mistakes I Made So You Do Not Have To
I want to be completely honest with you. Mistakes happened a few times when I first started doing this. Learning from failure is a normal part of the DIY journey.
One time, I put the new filter in upside down. Ignoring the airflow arrows was a truly terrible idea. My car windows kept fogging up during a heavy rainstorm. The air could not flow properly through the paper. I had to take it all apart and fix it in the rain.
Another time, I bought the cheapest filter I could find online. It felt very flimsy and did not fit the slot right. It let nasty dust pass right through the open gaps. Now, I always buy quality parts from trusted brands. Getting a good seal is vital.
Finally, never try to wash and reuse a dirty paper filter. I tried to vacuum my old one to save a few bucks. I ended up tearing the delicate paper pleats. It ruined the filter completely. Just go buy a fresh one. Your lungs will thank you.
Taking care of this simple task gives you a great sense of pride. You save money. Learning about your vehicle feels amazing. You breathe much better air every single day. It is a huge win for everyone.
Frequently Asked Questions
Do I need a wet/dry vac to clean the car cabin air filter housing?
A small 20V Milwaukee or DeWalt shop vac works great here. You need strong suction to pull out old leaves fast. This keeps bad dirt out of your car blower fan.
What screwdriver fits an older car cabin air filter door?
Most old cars just need a basic Phillips head screwdriver. A stubby hand tool fits best in that tight dark space. It helps you remove the plastic cover fast.
Is a bright work light needed to change a car cabin air filter?
Yes, the space deep under the front dash gets very dark. A small Makita or bright LED drop light helps you a lot. It lets you see the hidden plastic clips safely.
Should I use pliers to pull out a stuck car cabin air filter?
No, never grab the dirty paper pleats with harsh metal pliers. You will just tear the old filter into tiny pieces. Always use your bare hands to pull it out slow.
Can I store a spare car cabin air filter in a hot summer garage?
A hot Texas or Florida garage will not hurt a sealed paper filter. Just keep the box dry and away from yard pests. Damp air in cold tool sheds causes bad mold.