The Day My Mixer Just Gave Up
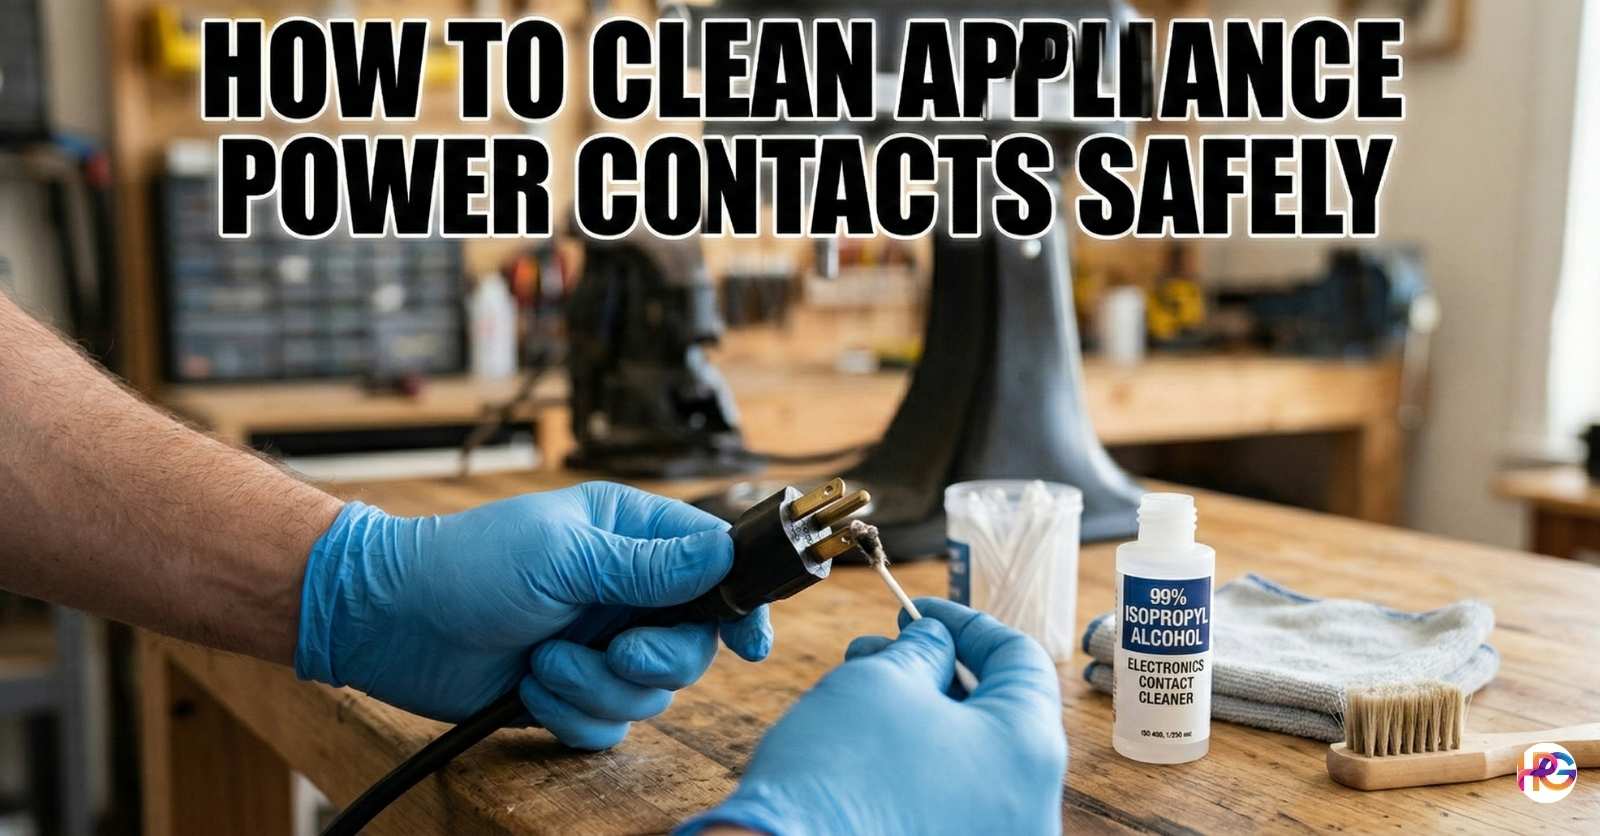
It was a damp Tuesday morning in my kitchen. I was mixing my weekly sourdough bread. The dough was sticky and very thick. My trusty stand mixer was working hard. Then it just sputtered and stopped flat. My heart sank. I smelled a faint metallic scent in the air. Fear crept in right away. Did I just burn out the expensive motor? These machines cost a lot of money to replace. I felt so silly for pushing the heavy dough too fast. But the motor was not dead. The problem was much smaller and sneakier. It was just a bad power connection. Thick flour dust and kitchen grease had coated the metal plugs. I had to learn how to clean appliance power contacts safely to save my favorite machine.
Figuring Out the Real Problem
First I unplugged the cord from the wall outlet. My hands were still a bit shaky from the scare. I wiped my hands on a dry towel and looked closely at the plug. The metal prongs were not shiny anymore. They looked dull and dark gray. A sticky thick film covered the base of the flat metal. I grabbed my phone flashlight and shined it into the machine port. It looked much worse inside. Years of cooking oils float around the warm kitchen air. They mix with house dust and settle on everything. When you plug and unplug a machine you pack that dirt deep into the metal joints. This blocks the raw power from flowing into the tool.
Signs You Need to Clean Your Plugs
Your machines will give you hints before they quit completely. You might see a tiny bright spark when you plug a cord in. The machine might run slow or sound very weak. Sometimes the thick cord feels warm near the wall socket. These are all bad warning signs. A clean metal joint stays nice and cool. A dirty one gets very hot. Heat melts plastic casings and ruins good home tools.
My First Big Mistake with Cleaners
Let me share a quick personal failure. Years ago my old soup blender started acting up. I thought it just needed a good hard scrub. I took a wet soapy dish rag and wiped down the power cord and the metal prongs. Then I plugged it in way too soon. A huge spark popped right out of the wall. It scared me half to death and tripped the home breaker. Water and electric parts are deadly enemies. Even a tiny drop can cause a bad short circuit. The hidden moisture also leaves behind red rust. Rust destroys solid metal fast. You must never use plain water for this job.
The Best Tools for Safe Contact Cleaning
You need the right gear for this repair fix. Luckily you probably have most of these items in your home tool box already. You want things that clean fast and dry even faster. Pure alcohol is your absolute best friend here. It cuts through old hard grease like magic.
Cleaning Tools I Keep at Home vs What to Avoid
| Use These Tools | Do Not Use These | Reason Why |
| Pure Rubbing Alcohol | Water or Dish Soap | Water causes sudden shocks and fast rust |
| Electronic Spray | Normal WD-40 Spray | Normal oil attracts thick new dirt |
| Cotton Swabs | Steel Wool Scrub Pads | Metal pads scratch the pure clean plating |
| Soft Dry Brush | Hard Wire Brushes | Wire tools ruin the flat smooth metal |
| Micro Cloth | Cheap Paper Towels | Paper leaves small dry dust clumps |
Step by Step Guide to Cleaning Safely
Here is exactly what I did to fix my mixer that Tuesday. This exact method works for big kitchen machines and small garage tools alike. You do not need to be a pro to do this right. You just need to be careful and take your time.
Step 1: Kill the Power Completely
You must remove all active power before you start. Pull the plug straight out of the wall socket. Do not just turn the main switch off. If your tool runs on a loose battery pack pull the heavy battery out. Place the battery far away from your wet work zone. Look at the device twice to be absolutely sure it has no juice left. Safety always comes first in home repair.
Step 2: Brush Away Loose Dust
Grab a clean dry toothbrush for this step. Gently brush the dull metal points. Sweep away all the loose flour crumbs and dry gray dust. Do this over a kitchen trash can if you can. You want to get rid of the easy dirt before you use any wet liquid. It saves you time and keeps the mess very small. The soft small bristles reach deep into tight small gaps.
Step 3: Dissolve the Tough Grease
Now we fight the stubborn sticky stuff. Pour a tiny bit of clear alcohol into a small cup. Dip a clean white cotton swab into the liquid. Squeeze the soft end tight so it is not dripping wet. Rub the swab hard against the flat metal sides. You will see the white cotton turn black right away. That is the old grease finally coming off. Roll the small swab to use all dirty sides. Throw it away and get a fresh clean one. Keep scrubbing hard until the new swab stays pure white. For deep dark holes use a thin wooden stick with thin cloth on the end. Be gentle but very firm.
Step 4: Let Everything Dry Completely
This is always the hardest step for me. I always want to test my new fix right away. But you must wait patiently. Alcohol dries very fast in open warm air. Still liquid can hide deep inside dark ports. Let the heavy machine sit on the counter for twenty full minutes. Open a nearby window if the room smells too strong. Fresh air helps it dry much faster. Do not rush this waiting part.
Inspect the Whole Power Cord
While you clean the end plug check the rest of the line. Wires bend and twist a lot over the passing years. Look for tiny split cracks in the soft rubber coat. Feel the long wire with your bare clean hands. It should feel perfectly smooth and solid. If you feel hard lumps or soft spots the inner wires might be broken inside. A bad frayed cord is a huge house fire risk. No amount of careful cleaning will save a snapped inside wire. If you find deep cracks stop using the tool right away. Tape is never a safe fix for high power lines. You must replace the whole cord.
Results After the Deep Clean
I waited my long twenty minutes. I wiped my hands clean one last time just to be sure. I pushed the shiny plug back into the wall outlet. It slid in nice and perfectly smooth. I flipped the power switch on the side of the mixer. The motor roared back to life instantly. It sounded much stronger than it had in many months. There were no sparks and no warm burning plastic smells. It gave just smooth steady power. I finished my sourdough bread prep with a huge happy smile. Knowing I fixed it myself felt truly great. A little bit of smart maintenance saved my favorite tool from the dark trash bin.
How Often Should You Do This
You do not need to clean every single plug every week. That is way too much extra work. But you should check them on a set strict plan. Machines that sit near the hot stove get dirty super fast. Tools left out in a dusty shed need more deep care too. Here is a simple cleaning plan to follow.
Suggested Cleaning Schedule
| Tool Type | Check Routine | Deep Clean Plan |
| Kitchen Gear | Every two months | Twice a year |
| Garage Tools | Every single month | Four times a year |
| Clean Room Stuff | Twice a year | Once a full year |
| Battery Packs | Every few weeks | Every three months |
Tools That Need This Fix The Most
Some items in your home fail much faster than others do. My daily coffee maker is a prime target for dirt. Hot steam and fine coffee dust make a thick muddy paste. This paste sticks hard to the wall plug and the hot base plate. Toasters are really bad too. Dry bread crumbs fall deep inside the thin slots. They catch fire easily if you just ignore them. Small power drills in the back shed suffer from fine saw dust. The heavy battery packs slide in and out a lot. The sliding motion packs the dust down tight onto the pure metal tracks. Always check gear that moves around a lot in the house.
Dealing With Small Battery Ports
Battery tools need a very different soft touch. A standard wall plug has large flat metal pieces. A drill battery has thin deep slotted tracks. You cannot fit a thick cotton swab inside those tight tracks. I use a clean stiff paper card for this specific part. I dip the very edge of the card in pure clear alcohol. Then I slide it up and down the dirty metal track. The thick black dirt scrapes right off the metal. It is quite fun and satisfying to watch. Just let it dry like normal before you charge it up again.
Safety Gear You Should Wear
You might think you do not need safety gear for this small job. I used to think the exact same thing. Then I got strong cleaner spray straight in my open eye. It hurt a whole lot. Now I wear clear safety glasses when I clean any tools. The fast wet sprays can bounce off flat metal right into your soft face. I also wear thin blue rubber gloves. The harsh chemicals dry out your hands fast. Dirty thick grease is hard to wash off raw skin. A good cheap pair of gloves makes the cleanup take just five quick seconds. Toss them in the trash bin and you are done.
What To Do If The Metal Is Rusted
Sometimes the outer grime hides a much worse problem inside. You might wipe away the top grease and see deep orange rust. Rust means real water got inside at some point in time. Soft alcohol will not fix thick bad rust. If the plug is badly rusted you have a tough choice to make. You can cut the thick cord and wire a brand new plug if you know how. Or you can take the broken machine to a pro repair shop. I do not mess with bad rust on main power lines. The risk of a short circuit is just way too high. Better safe than sorry when it comes to home electrical fires.
Keeping Dust Away For Good
You can stop some thick dirt before it ever starts. Store your best tools in closed plastic bins when you are done. Unplug things you do not use every single day. Do not leave long cords hanging near the stove where hot oil sprays. Wipe down the plain outside of your machines after you finish cooking. A clean tidy room means clean safe power cords. Simple daily habits save you a ton of time later.
Final Thoughts on Appliance Care
We spend a lot of money on tools to make our homes run well. Taking good care of them is a very smart move. Learning exactly how to clean appliance power contacts safely is a top life skill. It stops sudden fires and keeps your good gear running strong. My kitchen mixer works perfectly right now. My fresh bread turned out great that Tuesday too. Next time a machine quits on you do not just throw it out. Check the shiny plug first. You might just need a fresh cotton swab and a little rubbing alcohol. Clean contacts mean happy strong tools and a safe secure home.
FAQ: Cleaning Tool and Appliance Contacts
How do I clean appliance power contacts safely in a dusty shop?
You clean appliance power contacts safely with pure clear alcohol. Dip a soft swab and rub the bad dirt off the metal parts. Let it dry fast in your hot garage.
Can I use this fix on dirty DeWalt or Makita tool batteries?
Yes, you can clean the deep tracks on your power tool batteries. Dip a stiff card in clear alcohol and scrape the dark grime out. This gives you strong power.
Is normal WD-40 spray safe for dirty wall plugs?
No, do not use normal WD-40 on your thick wall plugs. It leaves a wet oil film that traps more cold garage dust. Buy a real electric spray to stay super safe.
What if my tool cord has thick rust from a cold damp shed?
Soft pure alcohol will not fix thick red rust on a metal plug. Rust comes from cold wet air and stops the raw power flow. Take the bad cord to a pro to fix it.
Why should I never use plain water to scrub my power tools?
Plain water is very bad for all live electric parts. A small wet drop can cause a huge spark when you plug it in. This ruins the fine tool and is a huge fire risk.