How to Remove Burnt Grease from a Stovetop (My Easy Cleaning Guide)
The Sticky Mess in My Kitchen
Let me paint a picture for you. It was a lazy Friday morning here in Alabama. I was in my kitchen feeling pretty good about life. A fresh loaf of sourdough bread was baking in the oven. My coffee was brewing quietly in the corner. I decided to fry up some eggs and snacks to start the day. The hot oil popped loudly. Splatters flew all over the metal grates. Wiping the counters later was easy, but I totally forgot the stove. A few days passed like a blur. Cooking several more meals made things much worse. That invisible oil turned into dark brown spots.
The smell of heating old oil is truly awful. It smells like a busy fast food joint that needs a deep clean. Dragging my finger across the biggest dark spot was a mistake. It felt exactly like sticky tree sap. The surface was rough and very sticky. I knew a simple wet rag would not fix this mess. Figuring out how to remove burnt grease from a stovetop without losing my mind became my mission. Nobody wants to spend their whole weekend scrubbing.
Why Grease Becomes Sticky and Hard
You might wonder why cooking oil gets so hard to clean. It all comes down to simple science. When liquid oil hits a very hot surface, it changes form. Intense heat makes the oil molecules link up tightly. They form a tough and sticky plastic shell. This wild process is called polymerization.
Every single time you turn on the burner, that shell bakes harder. It bakes deep into the metal or glass top. This is exactly why normal dish soap struggles to work. Breaking those tough chemical bonds apart requires a new strategy. I learned this the hard way after destroying two good sponges. You simply cannot scrub away a plastic shell with muscle alone.
My Essential Stovetop Cleaning Kit
Before we get into the steps, let us talk about tools. Having the right tools makes a huge difference. Buying expensive gadgets is not necessary to get the job done. Here is what I keep under my kitchen sink.
Microfiber Towels
These are my absolute favorite cleaning tools. Paper towels leave tiny white dust pieces everywhere. Microfiber grabs the dirt and holds onto it tight. They are soft and never scratch the shiny glass. Keeping a stack of cheap ones just for dirty jobs saves money.
The Right Sponges
Picking your sponge carefully is very important. I only buy sponges with a non-scratch scrub side. Usually, they are blue or pink colored. The green ones are way too rough for kitchen appliances. A green pad will put tiny scratches all over your enamel. Those scratches catch dirt and make future cleaning much harder.
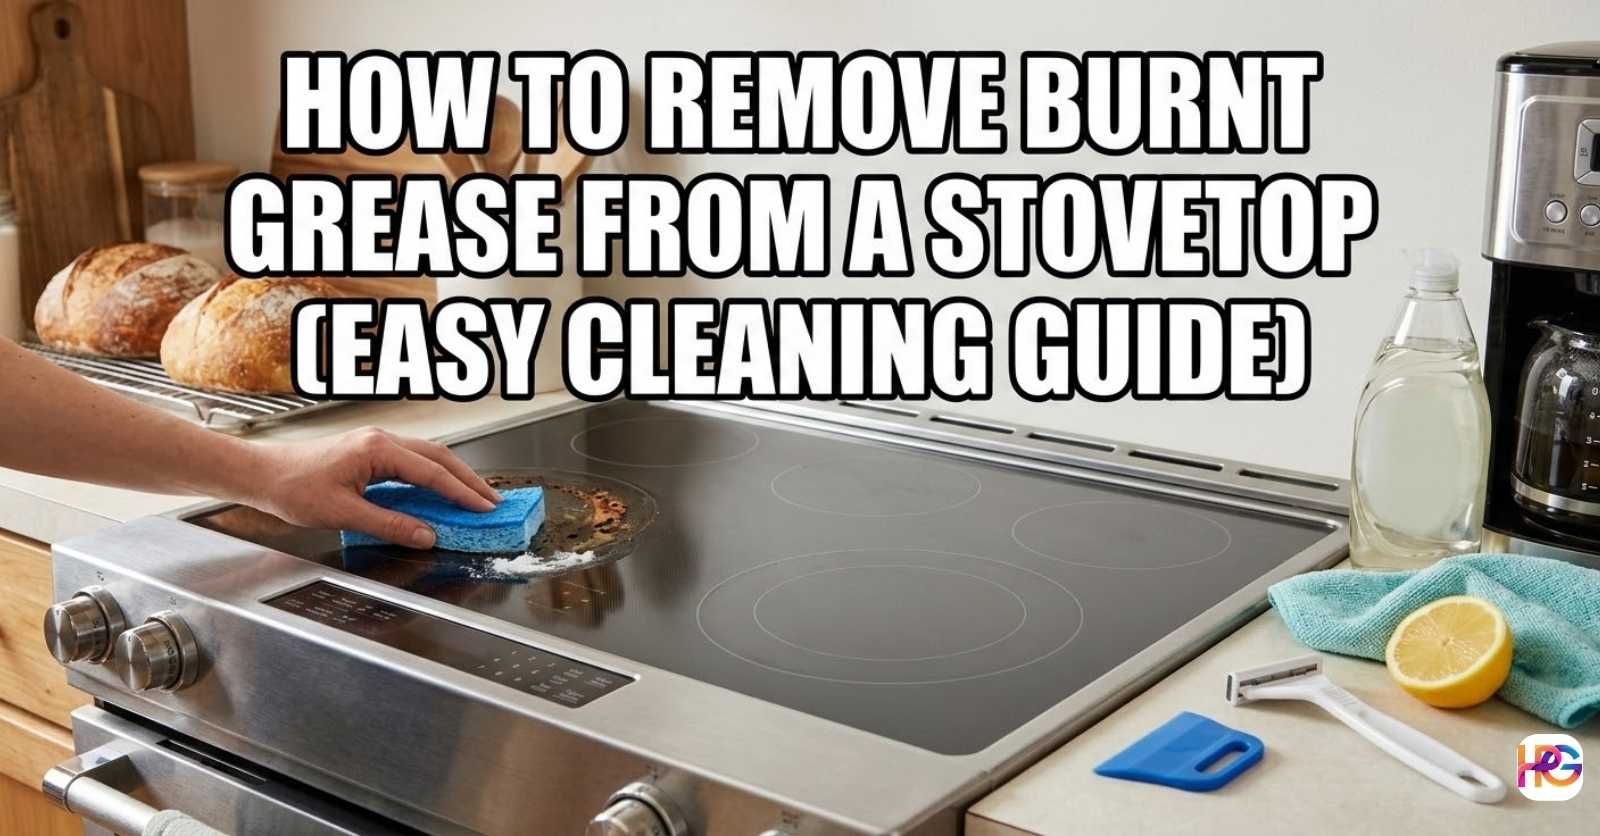
A Reliable Scraper
This little tool changed everything for me. It is a simple plastic handle holding a sharp razor blade. Using a razor might sound like a bad idea. But it glides perfectly flat over smooth glass tops. It pops off hard burnt crusts like magic.
My Best Stovetop Cleaning Method
Trying many fancy commercial cleaners in the past left me frustrated. These harsh chemical sprays made my eyes water. The results did not look much better than cheap stuff. Going back to basics was the smartest move I made. I found a simple method that actually melts the mess away.
Step 1: Wipe Away the Loose Dirt
First, clear the whole area of loose debris. Remove any crumbs or burnt food bits resting on top. Using a slightly wet microfiber cloth works best for this step. Do not scrub hard yet. Just gently wipe the flat surface. Creating a clear workspace is important before the real magic begins.
Step 2: The Magic Soak
This step is the absolute secret sauce. Real patience is required right here. Spray a heavy layer of a good kitchen degreaser over the mess. If you are out of that, mix strong dish soap with hot water. Pour it right over the dark spots. Then, walk away completely. Go check your emails or drink some more coffee. Letting it sit for ten to fifteen minutes is mandatory. The soapy liquid needs time to eat through that tough shell.
Step 3: Gentle Scrubbing
Now the old grease is very soft. It should look a bit cloudy and loose. Grab your soft blue sponge next. Rub the spots gently in small circles. The brown sludge lifts right off the metal. Watching it melt away is deeply satisfying. Adding more hot water and waiting again helps if a spot is stubborn.
Natural Grease Removers I Tested
Sometimes I do not want to use strong chemicals. My kitchen gets closed up, and chemical fumes give me a headache. Testing things right from my pantry became a fun experiment. Some natural tricks worked great. Others were a huge waste of time and energy.
Baking Soda and Vinegar Combo
This is my favorite natural cleaning trick by far. Sprinkle baking soda thick over the sticky spots. It looks just like dirty kitchen snow. Next, spray cheap white vinegar over the powder. It fizzes up and bubbles loudly. The chemical reaction lifts the baked-on dirt up naturally. Leave the fizzing paste alone for fifteen minutes. Then wipe it all away. It works like a charm for medium stains.
The Lemon Juice Trick
Reading online that lemons cut through oil fast gave me hope. I cut a fresh lemon in half right away. Rubbing the juicy side right onto the stovetop felt clever. It smelled totally amazing. The whole kitchen felt fresh instantly. Letting the juice sit for five minutes was the next step. Sadly, it only worked on fresh liquid splatters. It did nothing for the old, hard black crusts. It is good for a quick shine but bad for deep cleaning.
Comparing Natural Cleaners
| Cleaner Type | Best Used For | Soak Time Needed | My Honest Rating |
| Baking Soda Paste | Hard crusts and old stains | 15 minutes | 9 out of 10 |
| Fresh Lemon Juice | Fresh drops and nice smells | 5 minutes | 5 out of 10 |
| Hot Soapy Water | Daily wipes and light mess | 2 minutes | 8 out of 10 |
Cleaning Gas vs Electric Stovetops
Not all stoves are built the same way. Cleaning many different types over the years taught me a lot. Treating each style differently is crucial. Using the wrong tool can cause real permanent damage. Let us break down the main differences.
My Tips for Gas Stoves
Gas stoves have many extra pieces and loose parts. They collect hidden dirt in small dark corners. First, I take off the heavy iron grates. Dropping them gently into the sink comes next. I fill the sink with boiling hot water and dish soap. Soaking them deeply for thirty minutes does the trick.
The burner heads need special care too. Food falls into the tiny gas fire holes constantly. The cooking flames get weak and look uneven. Using a metal paperclip to poke the holes clean is safe. I never ever use wooden toothpicks for this job. A tiny toothpick piece can break off inside the hole. That blocks the gas and creates a big fire hazard. Always use strong metal to clear the burner ports.
Handling Glass and Electric Stoves
Glass tops look sleek and very modern. They are also total scratch magnets. Being super gentle with them is mandatory. I only use soft silicone scrubbers or wet rags on glass. Rough cleaning pads leave ugly swirl marks forever.
Finding a rock-hard sugar or oil spill requires my scraper tool. Hearing about using a blade sounds scary, but it works safely. Holding the metal blade flat at a low angle is key. Slowly pushing it under the burnt crust lifts the mess. The burnt food pops off in one solid neat piece. It feels exactly like peeling a sticky label off a new book.
Stovetop Cleaning Mistakes I Have Made
Over the years, making plenty of silly mistakes was part of learning. Sharing them here might help you avoid my pain. Learning from failure is the best way to get smarter.
Scrubbing While It Is Hot
I once tried to wipe a spill while the burner was hot. Ruining a perfectly good sponge only took two seconds. The plastic sponge melted right onto the hot metal. That melted mess was a total nightmare to fix. Always let the stove cool down completely first.
Flooding the Burners with Water
Another huge mistake was using way too much water. Flooding a gas burner seemed impossible until I did it. The small electric igniter got soaking wet. Clicking or lighting up was impossible for two solid days. Using wooden matches until the parts dried out was annoying. Use damp cloths, not soaking wet ones. Wiping gently is better than washing it like a car.
Using Harsh Powders
I bought a cheap scouring powder once to save time. My hope was it would save me heavy scrubbing. Rubbing it all over my shiny black stovetop was a bad idea. Wiping it away revealed the beautiful shine was gone. The powder had tiny sharp rocks inside it. It sanded away the nice glossy finish permanently. Stick to liquid cleaners or soft baking soda.
Daily vs Deep Cleaning Routines
Spending my weekend mornings scrubbing dirt is the worst. Avoiding heavy work means cleaning a little bit every single day. Saving so much time in the long run is worth it. Splitting my cleaning into two easy buckets keeps me sane.
The Quick Daily Wipe Down
Every evening after cooking dinner, waiting for the metal to cool is step one. Grabbing a wet cloth happens once it is fully safe to touch. Putting one single drop of dish soap on it is enough. Wiping the whole flat surface takes maybe thirty seconds. This completely stops the loose oil from cooking twice. It never gets a chance to turn hard or sticky. This one simple habit changed my kitchen life.
The Weekly Deep Clean
Once a week, giving the stove some real deep attention is needed. Usually, this happens on a quiet Sunday afternoon. Taking off all the loose knobs and metal grates starts the process. Washing them thoroughly in the sink prepares them for the week. Using my trusted baking soda paste on the main surface works great. Getting deep into the tight corners with an old toothbrush helps a lot. Drying everything perfectly with a clean towel finishes the job. A dry towel stops ugly water spots from forming.
Final Thoughts on Keeping Things Clean
A clean stove makes the whole kitchen feel nice and inviting. Cooking more meals at home becomes actually fun. Keeping bad burning smells far away makes the house much better. Doing the job right does not require expensive sprays. Hot water, some soap, and a little bit of patience are enough.
Remember to let the liquid cleaner do the really hard work. Stop scrubbing so hard until your arms start to ache. Just walk away and let the soapy water soak. That is the absolute biggest secret I can share with you today. Pick better cleaning habits and you will live a much smarter life.
Let me know if you want to hear about how I keep my oven clean next. Have you found any secret tricks for your own stove at home? I would love to chat about it.
Frequently Asked Questions About Stovetop Cleaning Tools
Can I use a metal shop scraper to clean my glass stovetop?
You can use a razor scraper tool, but keep it flat. Hold the blade at a low angle to pop off burnt grease safely. Never dig the sharp corners into the glass.
Is it safe to use a DeWalt drill brush on stove grease?
A drill brush spins too fast and might scratch a smooth glass top. Save your power tools for the garage. Stick to soft blue sponges for indoor kitchen jobs.
Can I use strong garage degreasers on my kitchen stove?
Shop cleaners are too strong for kitchen spots where you make food. They can ruin the clear finish on your stove. Use safe dish soap or baking soda instead.
Will my liquid kitchen degreaser go bad in a cold garage?
Cold freezing temps can ruin the mix in many liquid grease cleaners. Keep your spray bottles inside the house. This keeps the soap ready to melt sticky oil.
How tough are microfiber towels for wiping heavy burnt oil?
Good microfiber cloths grab dirt hard and last a long time. Just wash them without using fabric softeners. They hold up great against sticky stovetop grease.