
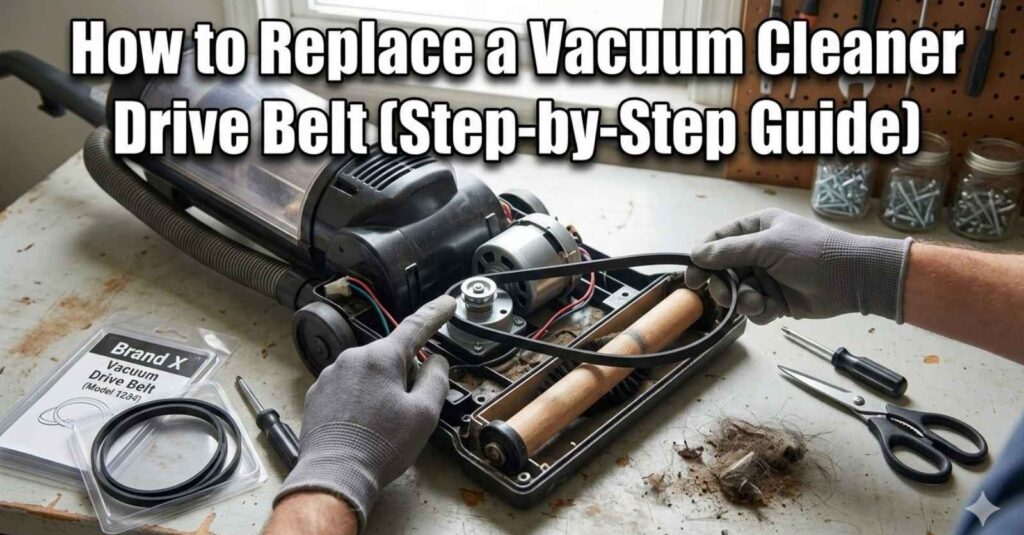
It was a bright Saturday at my house. Sun shone through the front room glass. Dust specs danced in the warm air. Cleaning the rugs was my first chore. I grabbed my trusty upright vacuum from the hall closet.
The long cord unwound with ease. Pushing the plug into the wall felt routine. Then things went quite wrong for me. I flipped the power switch with a loud click. A bad squealing noise filled the quiet room.
Thick gray smoke curled up from the floor. My nose filled with a bad, burning rubber smell. Fear set in fast. Yanking the cord out of the wall was my only thought. Silence returned to the living room.
Ruining a costly machine ruins a weekend fast. Buying a new one seemed like a huge waste. Taking a deep breath helped calm my nerves. The motor sounded strong right before I killed the power. Flipping the heavy machine over revealed the truth.
The problem was small and easy to fix. A thick rubber band inside was melted and snapped. Learning how to perform a Vacuum Cleaner Drive Belt Replacement became my morning task. I am glad I took the time to do it.
Why Do Vacuum Belts Break?
Rubber parts do not last forever. They work very hard under bad conditions. Rubbing and heat wear them down day by day. Knowing the cause helps stop future issues.
Old Age and Stretching
Rubber breaks down slowly over months of normal use. Heat from the motor softens the stiff parts. Pulling against a heavy brush stretches it out. A loose belt slips off quite easily. It soon gets too weak to handle the strain.
Snapping happens when the rubber finally gives out. Putting in fresh parts is just normal home upkeep. Making good choices keeps your house clean. You pick better habits to live a smarter life.
Sucking Up Bad Items
We all hate picking up tiny things before sweeping. Being lazy often leads to broken floor tools. Sucking up a stray coin is a big mistake. Hard things can jam the spinning brush roll fast.
The strong motor refuses to stop spinning. The rubber belt takes all the sudden force. It tears under the intense stress. Clearing the floor saves you time and trouble later.
Too Much Rug Rubbing
Thick rugs need different height settings than hard floors. Pushing rough bristles too deep into rugs creates drag. The machine fights hard against the dense yarn. Heat builds up fast when the system works this hard. Melting can happen where the rubber touches hot metal.
Finding a Broken Vacuum Cleaner Drive Belt
Smoke is a clear clue of a big problem. Quieter signs are much more common in daily life. Knowing what to look for can save you a repair bill. These clues point toward a broken or worn belt.
The Bad Smell of Burning Rubber
Rubbing is the true enemy of moving parts. The motor turns a small steel rod very fast. A stuck brush stops the rubber loop from moving. Hot metal then rubs against the stuck rubber edge.
Melting can happen in just a few seconds. The smell is strong and unpleasant. Turn off the power right away if you smell burning rubber. Unplug the vacuum and air out the room.
A Fast Loss of Suction on Rugs
Moving the machine over hard floors might feel fine. Rugs present a different test for your vacuum. Dirt stays deep inside soft carpet fibers. A turning brush helps lift heavy dirt toward the top.
Suction alone may not pull crumbs from deep carpet padding. Leaving pet hair behind can mean the brush roll is not working correctly. You should inspect the parts underneath. A new belt may be needed.
The Brush Roll Stops Moving
Testing the brush roll takes only a few seconds. First, make sure the vacuum is safely unplugged before inspecting it. Turn the brush by hand if the model allows it. The brush should rotate with some resistance but should not be completely stuck.
Still bristles can mean the belt is broken, loose, or the brush roll is jammed. Check the base before using the machine again.
Tools You Need for the Job
Fixing simple household items can bring a lot of satisfaction. Heavy gear is not needed here. Finding these simple tools takes just a few minutes.
| Tool Name | Why You Need It |
|---|---|
| Screwdriver | Removing the plastic base cover screws. |
| Scissors | Cutting away trapped hair and string. |
| New Drive Belt | Replacing the broken or worn rubber part. |
| Old Towel | Keeping your floor clean while you work. |
| Trash Bag | Holding dust, hair, and broken pieces. |
Finding the exact part for your unit is important. Look for a model number on the vacuum, often near the back or bottom. Write down the number before shopping. The wrong size can slip off or snap quickly.
How to Replace a Vacuum Cleaner Drive Belt Steps
Taking on this task feels scary at first. Removing screws makes some people nervous. Going slowly makes the process much easier. Anyone with basic tools can learn how to perform a Vacuum Cleaner Drive Belt Replacement.
Step One: Pull the Plug
Safety must always come first. Live power mixed with moving parts is risky. Pulling the plug keeps your hands safe. Spread an old cloth out on the floor.
Lay the vacuum down with care. Position the base so you can clearly see the brush area. Good lighting helps you see the small parts. Now you are ready to start the repair.
Step Two: Take Off the Base Plate
Look for the screws holding the plastic base cover. Several screws may secure the plate, depending on the model. Grab the correct screwdriver. Turn each screw slowly to avoid damaging the plastic.
Keep track of the tiny screws as you work. Putting them in a small cup is a useful trick. Lift the plastic base cover off the unit. Set it safely aside.
Step Three: Remove the Old Belt
The inner working parts should now be visible. Remove any broken rubber pieces. Throw them in the trash bag to clear your work area.
Lift the brush roll according to your vacuum’s design. Slide the loose belt off the brush roll and motor shaft. Inspect the brush roll for cracks, hair, or other damage.
Step Four: Clean the Mess Inside
Get ready for a very dirty sight. Years of hair and dust can collect in this dark area. Tangled string can restrict the moving parts. Cut through hair carefully with sharp scissors.
Pull the debris away from the brush roll and its ends. Clean parts can spin more freely and reduce strain. Wipe away leftover dust with a rag. A clean base helps the vacuum work properly.
Step Five: Put on the New Drive Belt
Open the new belt package. Fresh rubber may look much smaller than the old belt because the old one may have stretched.
Loop the new belt around the motor shaft first, if your vacuum design calls for it. Then stretch it over the brush roll. Make sure it sits in the correct groove.
The belt should lie flat. A twisted belt can wear quickly or come off when the vacuum starts.
Step Six: Test the Pull and Spin
Putting the brush roll back may require some effort. Stretch the new belt carefully without damaging it. Push the brush roll ends into their slots.
Spin the brush roll by hand. Movement should feel smooth, with some resistance from the belt. The belt should remain centered and should not rub against the plastic housing.
Adjust its position if needed before closing the base.
Step Seven: Close It Up and Try It
Put the plastic base cover back into position. Line up every screw hole carefully. Tighten the screws until they are snug. Do not overtighten them because plastic can crack.
Stand the vacuum back on its wheels. Before testing, make sure every cover and component is secure. Plug it into the wall and switch it on.
The vacuum should produce a smooth, normal sound. Test it briefly on a suitable floor or rug. If you hear squealing, smell burning rubber, or notice the brush stopping, switch it off and unplug it immediately.
Bad Mistakes I Made the First Time
Professional repair skills do not come easily to everyone. My mistakes taught me important lessons. Sharing them might save you some trouble.
Ignoring the height knob was my worst error. Forcing the lowest setting on a thick rug created too much resistance. The bristles dug deep, and the brush stopped turning properly. A new belt can fail quickly when the vacuum is overloaded.
Skipping the deep cleaning step was another bad choice. Finishing quickly seemed more important than doing the job properly. Thick pet hair can jam the brush roll. A fresh belt can then stretch or fail early.
Buying cheap unknown parts online also wasted my money. The low price seemed attractive. The replacement was slightly too long for my vacuum. It slipped from the motor shaft during cleaning.
How to Stop Future Damage
Spending nice days on repairs is not much fun. Making parts last longer is a better plan. Building smart habits can save money and frustration. Small checks make a big difference over time.
| Care Task | How Often to Do It | Why It Matters |
|---|---|---|
| Check the floor for hard objects | Every time | Coins and clips can jam the brush roll. |
| Cut away trapped hair | Once a month | Keeps the brush roll moving freely. |
| Check the rug height setting | When changing floors | Reduces drag and motor strain. |
| Inspect the belt | Every few months | Helps catch wear before failure. |
Looking at the floor takes only a few seconds. Picking up metal pins and hard toys can prevent sudden jams. These small objects can damage cleaning tools.
Checking the base of your machine monthly is wise. Keeping sharp scissors handy makes the task quick. Removing hair stops large clogs from forming. A clear brush roll can clean more effectively.
Changing the floor height setting also matters. The brush should not be forced deep into thick carpet. Excessive resistance can place unnecessary stress on the belt and motor.
Common Questions About Drive Belts
Folks often ask the same things about this repair. Learning the basics helps you keep your vacuum running well.
How Long Should a Drive Belt Last?
A drive belt may last around six to twelve months, but the exact lifespan depends on the vacuum, flooring, cleaning frequency, and belt quality.
Heavy use can wear belts faster. Pet hair, thick rugs, and jammed brush rolls can also increase stress.
Check the belt every few months. Look for cracks, fraying, glazing, stretching, or other damage. Replace it before it fails.
Can I Vacuum Without the Brush Moving?
Some vacuums can clean hard floors using suction alone. However, carpets often benefit from a working brush roll because it agitates dirt trapped in the fibers.
If the brush is not moving, avoid repeatedly running the vacuum until you know why. A jammed brush or damaged belt can create more problems.
Are All Drive Belts the Same Size?
No. Vacuum belts come in different sizes and shapes. A belt made for one model may not fit another.
A loose belt can slip from the motor shaft. An overly tight belt can place extra stress on the motor and brush roll.
Check your vacuum’s model number and follow the manufacturer’s replacement specifications.
Final Thoughts on Fixing Things
Fixing household equipment can bring a great sense of pride. Tossing out an expensive machine over a small fault feels wasteful. Spending a few dollars on the correct replacement part can save money.
Solving my problem that Saturday morning changed my mind. The scary squealing sound disappeared. The burning smell was gone. My carpet looked clean again.
This repair can be manageable when your vacuum model supports user-replaceable belts. Basic tools, patience, and careful work are the key. If your model has a different belt system or the motor appears damaged, follow the manufacturer’s instructions or contact a qualified repair professional.
Common Questions About Vacuum Belts
Will a hot garage ruin my spare vacuum cleaner drive belt?
Yes, high heat can accelerate rubber deterioration. Keep a spare vacuum cleaner drive belt in a cool, dry indoor location away from direct sunlight and excessive heat.
Do I need a power drill to change a vacuum belt?
No. A basic screwdriver is usually enough for models with a screw-secured base plate. Heavy power tools can damage plastic screws or housings. Simple hand tools are often the safer choice.
Why does my vacuum cleaner drive belt snap in cold weather?
Cold temperatures can make rubber less flexible. If your vacuum or spare belt is stored in a very cold location, the belt may be more vulnerable to cracking or failure. Let the machine return to normal indoor temperature before use when possible.
Should I buy a generic vacuum cleaner drive belt online?
A generic replacement can work if it is specifically compatible with your vacuum model. However, always compare the size, shape, specifications, and compatibility information. The correct fit matters more than choosing the cheapest option.
Can a broken vacuum cleaner drive belt ruin my rug?
A broken belt normally stops the brush roll from spinning. However, continuing to use a vacuum with a damaged belt, jammed brush, or other mechanical problem can create excessive friction and potentially damage the machine or flooring.
If the belt fails, unplug the vacuum, inspect the brush roll, replace the damaged part, and make sure everything moves freely before using it again.