How to Test a Heating Element with a Multimeter
It was a rainy Tuesday morning here in Jashore. Baking my weekly sourdough bread makes me so happy. Feeding my starter took days of careful work. The dough looked absolutely perfect. Sliding the cold pan into my oven felt great. Setting the timer for forty minutes was my next move. My mouth watered just thinking about that fresh crust.
Then things went wrong. Thirty minutes passed quickly. Peeking through the oven glass broke my heart. My beautiful bread was completely flat. It was doughy and sad. Opening the door confirmed my fears. A blast of cold air hit my face. The oven was totally dead.
Feeling a mix of anger and hunger is normal. Testing home tools and fixing things brings me joy. Writing guides for home enthusiasts is my daily passion. Letting a broken oven ruin my day was not an option. Fixing it myself sounded like a fun challenge. Grabbing my trusty digital meter from my tool bag felt right. Knowing exactly what to check first gave me confidence.
The heating coil is usually the main suspect. Breaking down is what they do best. Being a genius is not required to check it. You just need a simple tool and some patience. Today I want to share my exact process with you. Showing you how to test a heating element with a multimeter is my goal.
What a Heating Element Actually Does
Think of this part as a giant wire. Living inside your oven or dryer is its only job. Electricity flows through this thick wire. The wire fights the power bravely. This fight creates intense friction. Friction makes a massive amount of heat.
Your appliance uses that heat to cook food or dry clothes. It is a very simple design overall. Working the same way in a toaster is cool. Finding these metal coils in many common household machines is easy.
Over time, these thick metal wires get weak. Heating up and cooling down happens thousands of times. The metal expands and shrinks constantly. One day, the metal simply snaps. The electrical path breaks forever. Heat stops completely after that.
Cold food is all you get. Your wet clothes stay soggy in the dryer. This is exactly what happened to my sourdough bread. The long metal coil in the bottom of my oven snapped in half.
Why Visual Checks Matter
Sometimes you can just look at the coil. Seeing a big crack is possible. Spotting a melted dark spot happens often. Pulling out a flashlight is a smart move. Shining the bright beam inside my cold oven helped. Looking closely at the dark grey metal loop took time. Obvious cracks were nowhere to be seen. The metal looked fine to my naked eye. This meant digging deeper was required. Looks can easily fool you.
A hidden break inside the tube is very common. Seeing the inside of the metal casing is impossible. This is where a testing tool saves the day. Taking away the guessing game is why we use it.
Preparing for the Big Electrical Test
Safety is my main rule always. Skipping safety steps is a huge mistake. Electricity remains very dangerous. Getting hurt happens if you act lazy. Unplugging the machine first is mandatory.
If reaching the wall plug is hard, find your breaker box. Flipping the big switch to the off position works perfectly. Testing the machine makes sure the power is totally gone. Pressing the power buttons is a good check. Nothing should light up at all.
Once the power is off, remove the back panel. Every machine looks a bit different. My oven has a few metal screws on the back. Using a simple drill takes them out fast. Putting the small screws in a cup stops them from vanishing.
Finding the Power Terminals
Locating the back of the heating coil comes next. Two small metal spades stick out clearly. Wires stay attached to them firmly. These wires bring the heavy power. Taking a clear picture with my phone is my secret trick.
Photos help remember where the wires go. Pulling the metal clips off the spades gently is key. Sometimes they get stuck tight. Using small pliers wiggles them free easily. Now the part is ready for testing.
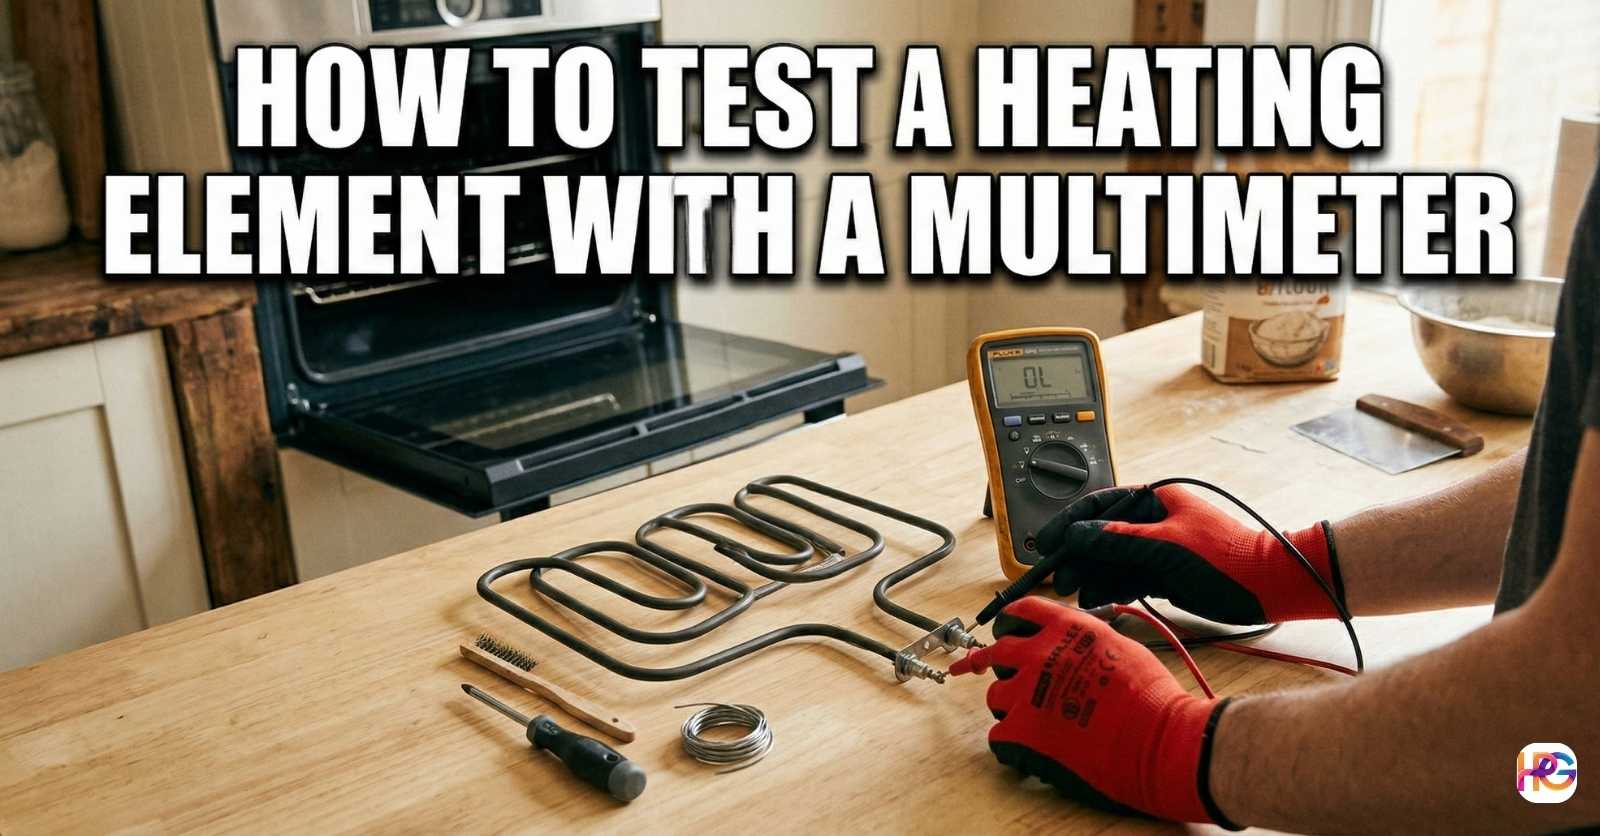
Step by Step Multimeter Setup
This is the most fun part. Using my meter brings me joy. Feeling like a real detective is great. A digital multimeter measures electrical paths quickly. Sending a tiny bit of power from its own battery does the trick.
If the power makes a full circle, the part is good. Stopping the power means the part is broken. Checking for resistance is what we call this. Resistance is measured in tiny units called ohms.
Turning the dial on my meter came first. Pointing it to the ohm symbol is required. It looks exactly like a little horseshoe. Picking the lowest setting works best if your tool has numbers. The number two hundred is a perfect choice.
Testing my tool first is a smart habit. Touching the red probe to the black probe proves it works. Screen numbers should drop near zero instantly. My meter beeped loudly right away. Telling me the tool was working perfectly made me smile.
Taking the Actual Reading
The red metal probe went on one spade. Touching the black metal probe to the other spade happened next. Color does not matter for this test. My eyes watched the digital screen closely.
Jumping to a new number happened fast. This number tells you the whole story clearly. Knowing if you need to buy a new part comes directly from this screen.
Reading Your Resistance Values
Understanding the screen numbers is quite simple. Using a handy guide is all you need. Different machines have different normal ranges always. A small toaster has a different number than a huge oven.
Good Versus Bad Numbers
| Meter Screen Reading | What This Number Means | Next Step to Take |
| 10 to 30 Ohms | The metal coil is healthy. | Check other machine parts. |
| OL or Number 1 | The metal coil is broken. | Buy a replacement part. |
| Exactly Zero Ohms | The part has a bad short. | Replace the part safely. |
My screen flashed the letters OL brightly. Standing for open loop is what those letters do. Meaning the path is dead is the bad news. My oven coil was officially broken inside. Feeling happy to find the problem was weird. Feeling sad about buying a new part was very real.
Most large ovens should read between ten and thirty ohms. Seeing a number in that range means your coil is fine. Hiding somewhere else is where your real problem lives. Having a bad control board is possible. A broken heat sensor might be the tricky villain.
A reading of exact zero is terrible news too. Power rushing through too fast is what that means. We call this a bad short circuit. Tripping your house breaker will happen soon. Throwing that part away is your only choice.
What That Gross Burnt Smell Means
Before my oven died, a weird smell happened. Smelling like burnt toast mixed with hot pennies was strange. Smells give you really great clues. Warning you before things break down entirely is super helpful.
A bad smell does not always mean a broken part. Being perfectly normal happens sometimes. Other times it serves as a massive warning sign. Smelling many strange things while fixing machines is part of the job.
Normal Burning Smells
New things often smell quite funny. Buying a brand new heater guarantees a bad smell initially. Factories put protective oil on the bare metal. Keeping the metal safe during shipping is the goal. Getting hot the first time burns the oil off.
Going away after ten minutes is normal. Opening a window helps clear the room. Panicking over a brand new machine smoking slightly is silly.
Dust also causes terrible smells sometimes. Not using your heater all summer lets dust gather. Turning it on in winter burns the dust instantly. Making a quick burnt hair smell is the dusty result.
Dangerous Burning Smells
Some smells remain very dangerous. Smelling melting plastic means turn off the power right away. This is certainly not normal dust. Melting plastic wire covers cause serious trouble. Causing a bad house fire is a real risk.
A strong electrical burning smell acts as a huge red flag. Smelling sharp and chemical is the key sign. Power going to the wrong place creates this. Using the machine is totally unsafe now. Unplugging it fast is your best move.
My oven just smelled like hot metal slightly. Acting as a sign the coil was getting weak was obvious. Working too hard caused the metal to fail. Snapping in half finally stopped the heat completely.
When You Must Replace the Element
Fixing a broken heating coil is impossible. Taping it back together will never work. Gluing it is a complete joke. Buying a brand new one is totally required. Trying to repair it remains a terrible idea.
Ordering a new part online was very easy. The box arrived exactly three days later. Our kitchen stayed sad and cold for those long days. Eating cold sandwiches got really old fast.
Throwing away your old part is smart if you see these clear signs of failure.
Clear Signs of Appliance Failure
| Warning Sign | Why It Happens | What You Should Do |
| Failed meter test | Internal wire snapped | Throw it in the trash |
| Big physical crack | Metal got too hot | Order a new part today |
| Tripping house power | Short circuit issue | Stop using it right now |
The new part came out of the cardboard box smoothly. It looked very shiny and clean. Sliding it into the oven took only seconds. Metal screws went back into their old holes easily. Both power wires snapped into place perfectly.
The thick plug went back into the wall socket. Holding my breath felt silly but totally natural. Pushing the bake button was the big moment of truth. Setting the heat to four hundred degrees was exciting.
Five minutes later, opening the door was wonderful. A blast of perfect heat hit my face. The repair ended up being a complete success. My meter helped me save a whole lot of money. Calling an expensive repair guy was totally avoided.
My Final Thoughts on Home Repairs
Fixing things around the house feels deeply amazing. Giving you a great sense of pride is the best part. Writing guides to help you feel that same pride is my mission. Having the power to fix your own stuff is awesome.
Do not let a broken machine scare you away. Taking a deep breath helps calm the nerves. Grabbing your tools is the very first step. Following the simple steps slowly prevents bad mistakes. Learning so much about how your house works is a fun bonus.
Testing parts remains the absolute best way to start. Taking away the mystery makes things easy. The meter tells you exactly what is wrong quickly. Lying to you is something a meter never does.
Mixing a new batch of sourdough happened that night. Waking up early the next day felt great. Putting the dough in my newly fixed oven was exciting. The bread came out looking absolutely perfect. The crust was beautifully thick and crunchy. Our house smelled completely amazing again.
That simple repair officially saved my breakfast. Hoping my story helps you fix your machines is why I share this. Keeping your tools handy is always smart advice. Knowing when you will need them next is impossible.
Frequently Asked Questions
Can any cheap multimeter test a heating element safely?
A cheap meter works fine for quick checks. But a tough Fluke tool survives cold garage drops much better. It reads ohms safely to test your heating element.
Do I need to remove the heating element to test it?
You do not have to pull the whole part out. Just unplug the heavy machine first for safety. Touching your meter probes to the metal spades works perfectly.
What does the OL mean on my digital multimeter screen?
The letters mean open loop on your tool screen. This tells you the thick wire inside is broken. Your meter confirms the dead part needs a fast swap today.
How often should I calibrate my multimeter before a test?
You must check your meter tool every single time. Touching the two metal probes together does this fast. It makes your ohms test perfect for home repairs.
Will a bad heating element trip my garage breaker?
Yes, a dead heating coil can trip your main power box. The metal part shorts out against the frame. Testing it with a meter shows this huge safety risk fast.