Step-by-Step Guide: Fixing Common Coffee Maker Water Flow Issues
A Rough Morning Without Coffee
It was a freezing Tuesday morning in Denver last winter. I just wanted a hot cup of coffee to start my day. A fresh slice of sourdough bread was ready to toast. My stomach was growling loudly for some warm morning food.
I walked into the kitchen and turned on my trusty machine. But instead of a smooth brew, I heard a sad noise. Then, nothing happened at all to make my morning better. The unit just sat there on the dark kitchen counter.
There is nothing as bad as waking up to a broken coffee maker. Craving that first cup is a real strong physical feeling. You hear the pump click on with very high hopes. But no water makes it to the brew basket at all.
When Things Go Wrong Fast
Or worse, water starts leaking all over your clean counter. Panic might set in right away when this messy thing happens. You might think you need to buy a brand new one. Calling an expensive repair guy might seem like the only choice.
But you do not need to do any of that today. Fixing most of these common problems yourself is actually very easy. I have dealt with this exact bad situation many times. Running a site called Home Pick Guide has taught me a lot.
My Experience With Coffee Machines
My whole goal is to help you pick better and live smarter. Testing kitchen gear is a huge passion of mine every day. I own a high end Technivorm Moccamaster that I love dearly. Also, a fast Bunn Velocity Brew sits right next to it.
A daily driver pod machine gets used quite a bit too. Last year, my Nespresso Vertuo Plus gave me a huge headache. It just stopped working right out of nowhere one morning. So I took it completely apart on my wooden kitchen table.
Learning how to fix it was fun and saved me cash. Most water flow issues come down to a few basic things. You might have hard mineral buildup blocking the main tubes. A tiny clogged valve could be the hidden culprit inside.
Before You Start Fixing
A worn out rubber seal might be letting hot water escape. I want to share my personal fix-it tips with you now. Here is my direct guide to get your machine working fast. Safety first is always my strict rule for any home repair.
Unplug your coffee maker from the wall outlet right now. Make sure the hot plate has cooled down before you touch it. Doing this keeps you safe from bad shocks and painful burns. Let us jump right into fixing your broken morning brewer.
Issue 1: The Machine Will Not Pump Water Or Just Sputters
Let me tell you about the time my machine refused to work. I heard the heater click on loudly like it normally does. Feeling the heat coming from the base was very easy. But absolutely no water moved up into the top plastic basket.
The entire internal water path was totally blocked by hard scale. It is a very common problem that happens to almost everyone. Hard water is the worst enemy of any hot kitchen appliance. Calcium and scale build up inside the tiny metal heating tubes.
This nasty scale acts exactly like a solid stone brick wall. It slows the water flow down slowly month by slow month. Soon it blocks the boiling water totally and stops the pump. Starting with a deep clean is always my very first advice.
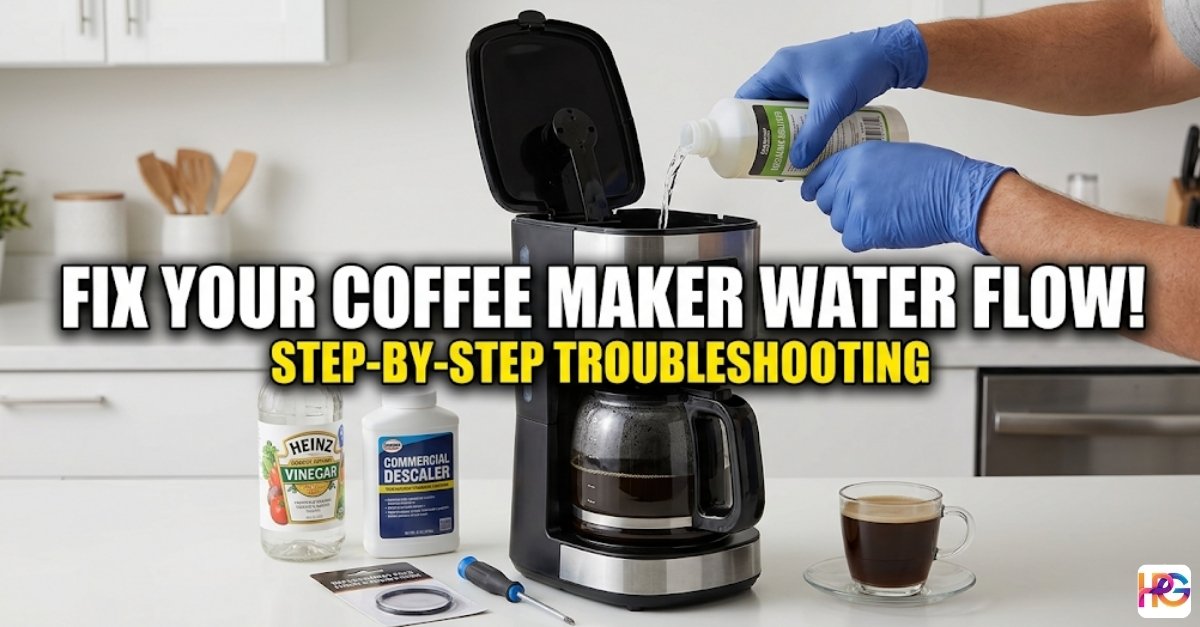
Step 1: The Deep Descale For Mineral Clogs
Prepare the Machine
First, you must empty the main plastic water tank completely. Dump out all the old water sitting in the clear bin. Getting a fresh start makes the whole cleaning process work better. Next, mixing the right cleaning liquid is a super important step.
Filling the tank with white vinegar and distilled water works great. I use exactly half vinegar and half water for the best fix. Buying a store brand descaling liquid is another very good choice. Either one works perfectly fine to melt away the hard white rocks.
Descaling Guide Table
| Water Type | Mineral Level | Descale Frequency Needed | Taste Impact |
|---|---|---|---|
| Soft Water | Low | Every 6 months | Clean and bright |
| Normal Water | Medium | Every 3 months | Slightly dull |
| Hard Water | High | Every 1 month | Very bitter |
| Well Water | Very High | Every 2 to 3 weeks | Harsh and metallic |
Run and Pause the Brew Cycle
Now, you run a full brew cycle just like making coffee. Turn the power switch on and let the main pump run. If your internal pipes are clogged, the liquid might not move. Giving it a minute to warm up usually helps push it.
Then, pausing the cleaning process is the big secret trick. I turn the machine off right in the middle of the brew. Letting the hot acid sit inside the internal plumbing is vital. Leaving it inside there for forty minutes does the main trick.
Flush and Finish
This gives the acid enough time to eat the thick calcium. Finally, flushing the whole system out is the last important step. Turn the power back on to finish pushing the liquid through. After that completes, run three full pots of fresh clean water.
Washing out all the leftover vinegar taste is very crucial. Nobody wants their morning coffee to taste like a sour pickle. Doing this simple task keeps your machine running for many years. It is the best secret to great tasting hot coffee at home.
Step 2: Unstick The Sneaky One Way Valve
Understanding the Problem
Sometimes the simple vinegar trick is just not strong enough. Many fast drip brewers use a hidden one way valve inside. This tiny part pushes boiling water up to the top spray head. The valve is usually just a small glass or plastic ball.
It sits inside a thick metal heating tube under the pot. If dirt glues this round ball in place, water will not pump. Getting stuck is very common if you skip your weekly cleaning. I had this exact thing happen on my Bunn brewer recently.
Opening the Machine
Hearing the normal pump sound confused me at first that day. Nothing came out of the spray head no matter how long I waited. First, accessing the base of the machine is required for this fix. Unplug the unit carefully and flip it upside down on a soft towel.
Using a simple screwdriver lets you remove the bottom plastic panel. Seeing all the hidden wires and soft tubes inside is actually cool. Next, finding the specific stuck valve is your main daily goal. Look closely for a clear soft tube inside the hard plastic housing.
Fixing the Valve
It connects the water tank directly to the metal heater block. Now, clearing the deep blockage takes a very gentle soft touch. Taking the soft tube off the metal nozzle takes a little wiggling. Looking directly inside the metal hole reveals the tiny stuck ball.
Grabbing a wooden toothpick or a bent paperclip helps right here. I use it to gently push and free the stuck ball inside. It should bounce and move easily when you tap it lightly. After that, cleaning and putting everything back finishes the hard job.
Reassemble and Test
Flushing the small opening with pure vinegar removes sticky wet dirt. Pushing the soft rubber hose back on tight comes very next. Screwing the bottom plastic plate back into place finishes the repair. You just saved yourself from buying a brand new appliance today.
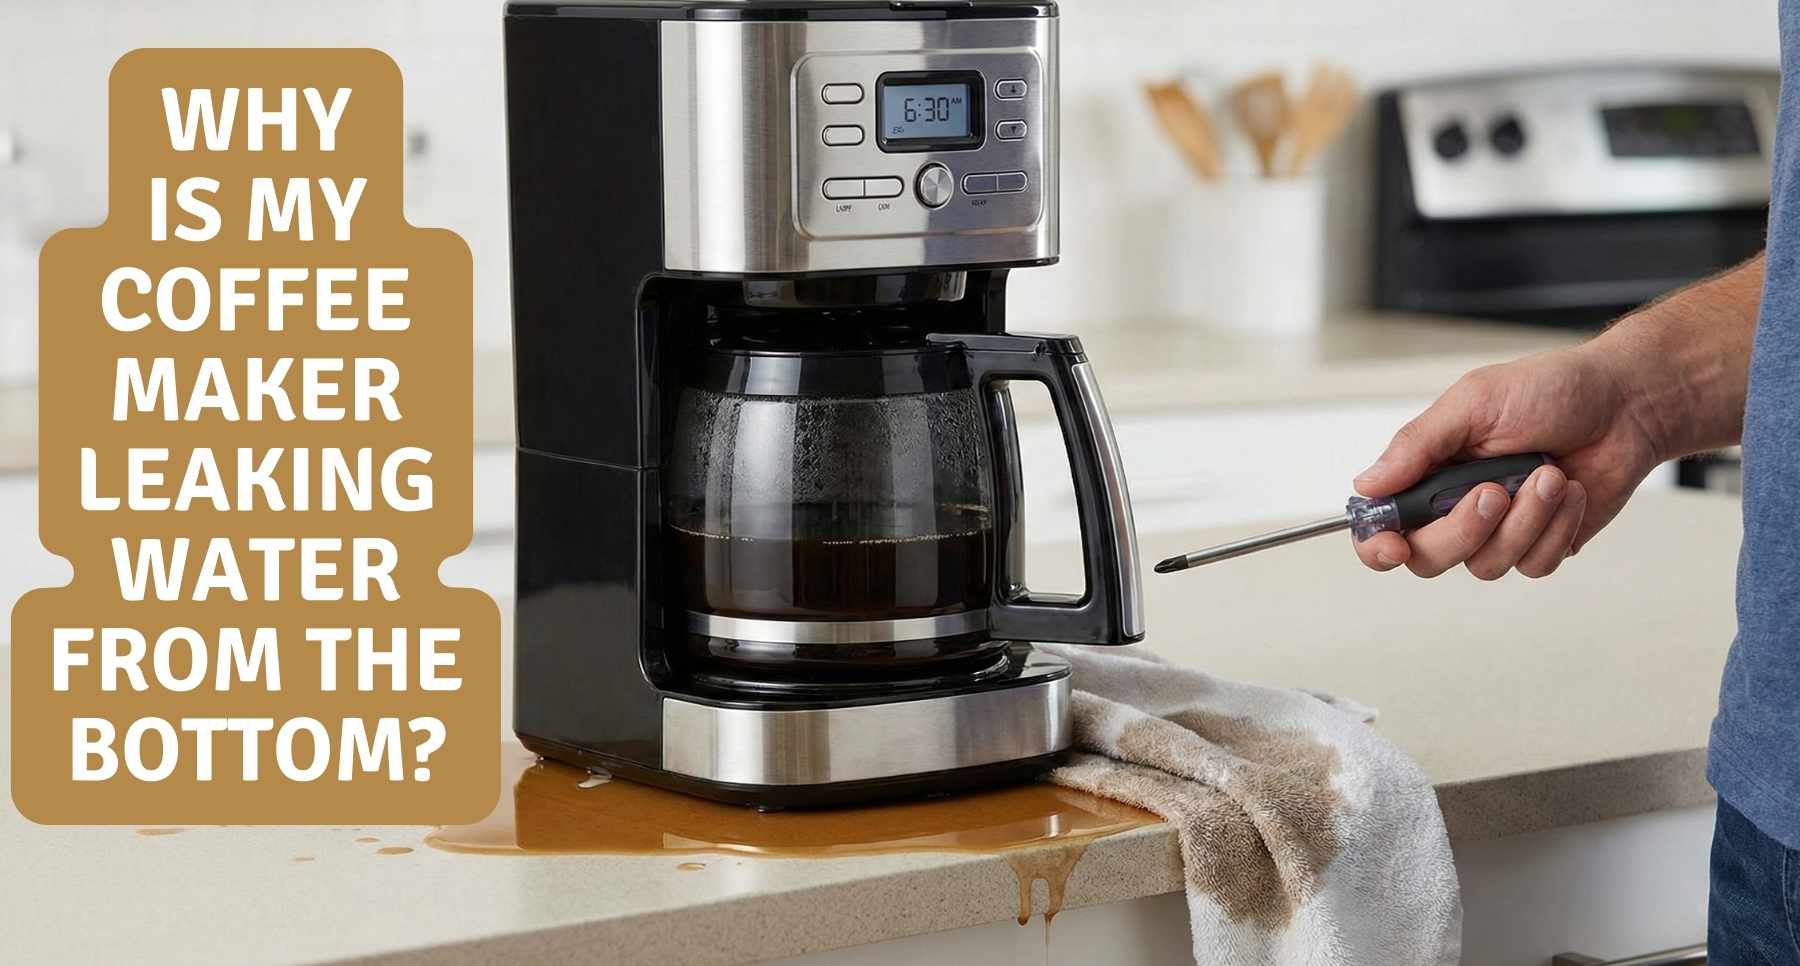
Issue 2: Water Is Leaking From The Bottom
Finding a huge puddle of water on your counter is just awful. It totally ruined my peaceful morning routine late last month. Puddles forming under your machine usually mean one of two things. You either have a bad rubber seal or a loose internal hose.
Let me show you how to fix these annoying leaks fast. The steps are very simple and take just a few short minutes. You do not need any fancy power tools to get this done. Grab a simple dry rag and a screwdriver to get started.
Step 1: Check The Reservoir Seal And Rubber O Ring
Many popular machines feature a handy removable clear water tank. My daily pod machine has one sitting right on the smooth back. The small seal at the very bottom of the tank breaks easily. Failing over time is just a natural part of the product life.
Checking the rubber O ring first saves a lot of random guessing. Take the clear water tank completely off the main plastic base. Look closely at the small rubber gasket at the bottom joint. Next, cleaning the seal carefully fixes many fake water leaks.
A warm damp cloth works absolutely best for this simple job. Wiping away any stray coffee grounds stops messy leaks instantly. Removing hidden hard water scale from the plastic rim is very important. Just a tiny speck of dry dirt stops the tight round seal.
Checking for deep physical cracks is the very next careful step. Rubber naturally dries out and shrinks as it gets much older. If your tiny O ring feels hard or totally flat, it must go. Replacing the broken part is an absolute must for a dry counter.
You do not need to buy a fancy expensive brand name part. Taking the old broken ring to my local hardware store is smart. Finding a cheap rubber swap that matches the exact size is easy. It usually costs me less than a single dollar to fully buy.
Step 2: Inspect The Internal Silicone Hoses
Your machine gets extremely hot inside when it makes a pot. Intense daily heat does really bad things to the hidden soft parts. The soft rubber tubes inside can dry rot slowly over a few years. Splitting open from high pump pressure is another common bad failure.
Sometimes they simply slip right off their smooth white plastic pegs. To check this hidden issue, opening the bottom panel is totally required. Unplug the coffee maker from the dangerous wall power line again. Take out all the metal screws and remove the flat base plate.
Tracing the entire water path is the best way to find messy leaks. Follow the soft tubes straight from the water tank to the hot heater. Following the tubes from the hot heater up to the top comes next. Finding the actual problem lets you fix it super duper fast.
Pushing a slipped hose back onto its peg takes only a quick second. Securing it tightly with a small plastic zip tie is my favorite fix. Keeping it tightly bound stops it from ever slipping off again. Buying new food grade heat rubber tubing online solves torn hoses.
Measuring the inner hole size perfectly ensures you get a snug fit. Cutting the new soft tube to the exact same length is very easy. Pushing both ends onto the plastic pegs makes it good as new. Your clean counter will stay perfectly dry from now on.
Issue 3: Slow Drip, Weak Flow, Or Erratic Spraying
Sometimes your machine pumps water just fine from the main tank. But the whole brew process takes twice as long as normal today. Water shooting out sideways and missing the coffee grounds is very messy. The main problem is usually hiding right at the very end part.
The hot water has trouble getting out of the final tiny holes. This makes your morning drink taste weak and very weirdly watery. Fixing this end part brings the rich bold brown flavor back quickly. Let us clean the top pieces to get things flowing right.
Step 1: Clean The Top Showerhead Component
The top showerhead sprays hot water evenly over your fresh brown grounds. It features lots of tiny holes designed for a perfect wet soak. These small holes clog up very easily over normal daily morning use. Mineral scale blocks them silently from the inside out every week.
Wet coffee grounds can also splash up and plug the bottom holes. Removing the dirty spray head is your very first simple step. On most high quality machines, this part easily unscrews by bare hand. Popping it right off with a gentle downward pull works on others.
Soaking the dirty plastic part breaks down the hard crud fast. Dropping the whole piece into a small bowl of warm vinegar helps. Letting it soak underwater for about fifteen minutes loosens the tough scale. Clearing every single tiny hole requires a sharp pointy metal tool.
Taking a sharp safety pin from the bathroom works super great. A thin metal sewing needle does the exact same job perfectly. Poking the sharp pin straight through each tiny hole is deeply satisfying. Pushing out trapped hard water scale restores the fast flow instantly.
Rinsing and attaching the clean part finishes this quick little task. Holding it directly under warm running sink water is needed right now. Washing away the strong sour vinegar smell protects your next tasty drink. Screwing it firmly back into place ensures it will not fall down.
Step 2: Check The Replaceable Water Filter
Many really nice coffee machines use a small black water filter inside. It sits deep down inside the main clear plastic water tank. Trapping bad tastes and harsh city chemicals is its main daily job. Getting clogged over time is just proof that it is actually working.
An old dirty filter will completely stop pure water from flowing smoothly. Acting exactly like a dirty wet sponge, it holds everything back tight. Severely restricting the electric pump causes a terrible slow tiny drip. Learning this the hard way taught me a really good life lesson.
Throwing a three month old filter straight into the trash bin is smart. Doing more harm than good is a real problem with old black carbon. Replacing it quickly with a fresh new one restores pump pressure instantly. Preparing a brand new filter properly is a step many people skip.
Dropping it dry into the tank is a huge common silly mistake. Letting the new filter soak in a cup of cold water is required. Waiting for ten full minutes primes the dry charcoal dust perfectly well. Installing it securely in the clear tank holder completes the fast process.
Fixing your favorite coffee maker is usually a very simple morning project. A little clear patience is really all you need to totally succeed today. Clearing out thick hard scale is surprisingly quick and very much rewarding. Unsticking a tiny hidden valve takes just a few short fast minutes.
Changing a cheap rubber seal easily saves you hundreds of hard dollars. Throwing your broken machine away is totally not required right anymore. Picking better and living smarter means taking good care of your gear. Now, I will finally sit down and enjoy my hot fresh coffee.
FAQ: Fixing Your Coffee Maker Flow
Common Coffee Maker Tool Questions
What basic tools do I need for this repair?
You need a small screwdriver and a thin needle. A toothpick helps clear out stuck valves fast. These simple tools make the job very easy for any home fan.
Is it safe to open my coffee machine for a fix?
Unplug the power cord from the wall first. Let the metal heater cool down to avoid hot burns. Staying safe is the most vital part of any home tool job.
How can I make my coffee maker pump last longer?
Clean your unit with white vinegar once every month. This stops scale from hurting the pump and tubes. Good care keeps your gear running like brand new.
Can cold weather in a garage damage my machine?
Freezing air can crack the tank and soft rubber seals. Keep your tools in a warm spot to stop leaks. Cold makes thin hoses break very easily in the winter.
Are standard hardware store O-rings safe to use?
Use food-grade rubber seals for parts that touch water. Standard rings might have oils that taste bad. Check the size to get a tight grip and stop leaks.