That Awful Smell on a Rainy Day
It was a rainy Tuesday here in Alabama. The wet air felt heavy and very thick. Dust covered my wood floors after a long week. Grabbing my vacuum seemed like a great plan then. Pushing the power button changed my mind fast.
A bad odor hit my nose right away. The blast of air smelled like a wet dog. Old damp socks came to my mind next. Coughing a bit made me step back fast. Dirty air filled the whole room within seconds.
Turning the motor off was my only real choice. Something was clearly wrong inside my favorite tool. I needed to fix this gross issue today. Leaving it alone would just make things worse. I had to look deep inside the machine.
Finding the Source of the Stink
Opening the room windows let some fresh air inside. That bad smell stayed in the house anyway. Sitting down gave me a quick moment to think. Keeping things clean is my daily personal goal. Helping you pick better and live smarter is my true passion.
Yet my own cleaning tool was stinking up the house. Feeling a bit silly was totally natural for me. Finding the source of the stink became my new job. Unlatching the plastic dust bin was the first step. Pulling out the main air filter revealed the truth.
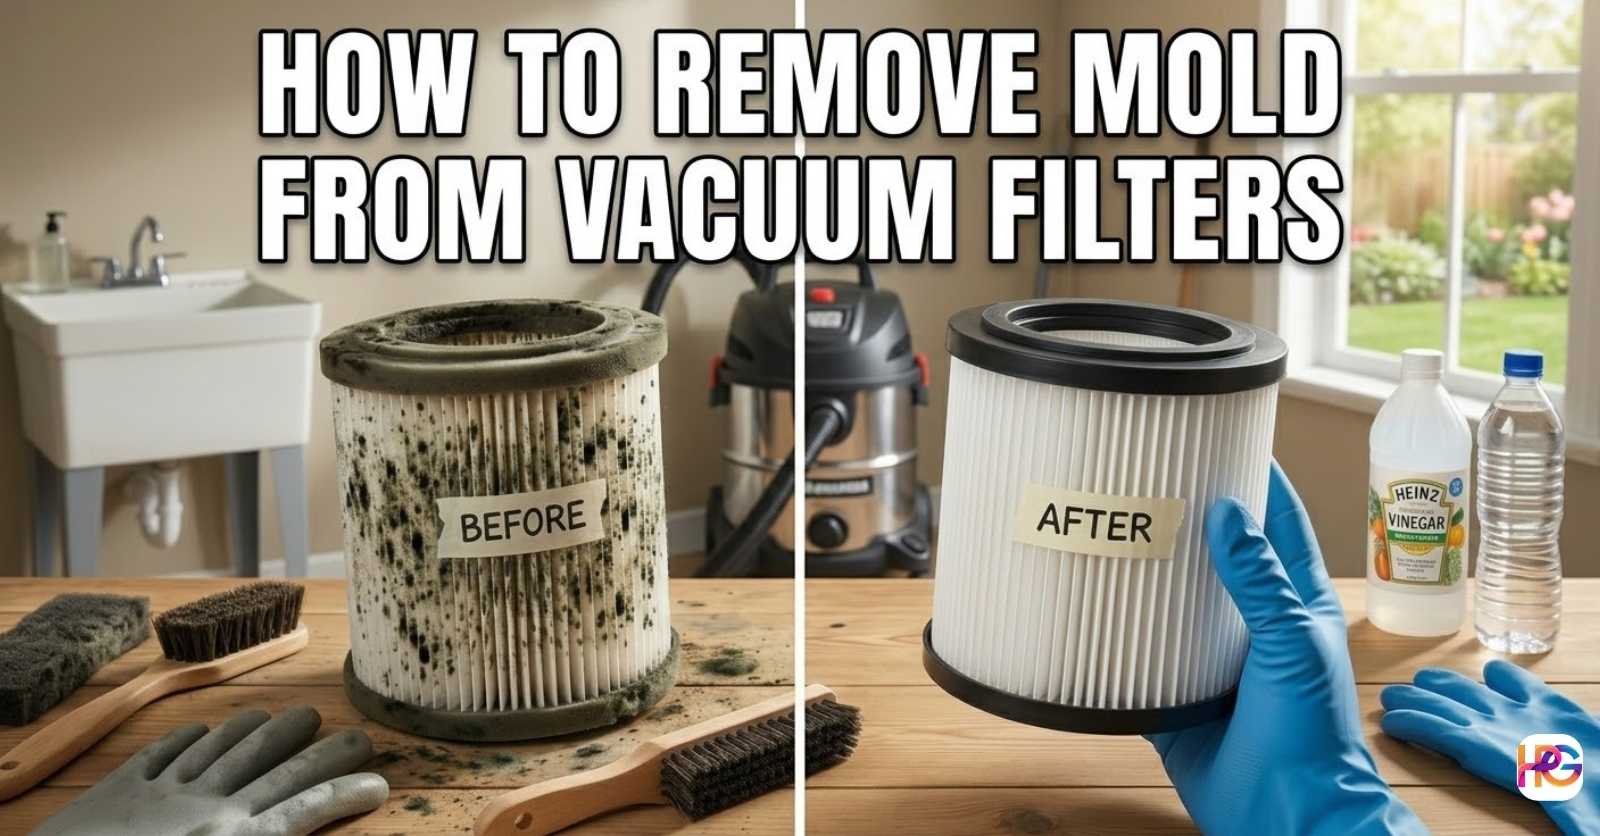
The sight of it made me cringe so hard. Dark fuzzy spots covered the tiny white folds. Mold had taken over the core of the foam. A huge mold issue lived right inside my vacuum. I knew I had to act fast to save it.
Why Mold Grows in Dust Bins
Mold acts in very sneaky ways inside your home. This pesky fungus needs three simple things to grow. Darkness is the first big thing it craves. Food is the second basic need for the spores. Water is the final missing piece of the puzzle.
Vacuum cleaners make a perfect home for mold. The inner dirt bin stays dark all day long. Dead skin cells and dust offer plenty of food. Water is the only thing usually missing from the mix. Adding water makes the whole thing a huge mess.
The Big Mistake I Made
Where did the water come from in my case? Thinking back to last week gave me the answer. Cleaning the rug near the front door was my mistake. My kids had tracked in wet mud during a storm. Sucking up that damp dirt caused a huge issue.
The wet mud stayed trapped inside the tight filter. That warm dark space did the rest of the work. Mold spores grew very fast in the dark dampness. My soft filter was completely ruined in just four days. I felt foolish for rushing my chore that day.
A Hard Lesson Learned
Learning a tough lesson hurts my pride some days. Cleaning wet spills with a dry machine is very bad. Doing this bad habit will cost you extra money. It also creates a massive smelly mess in your closet. You must keep water away from dry dirt bins.
I promise to never make that silly mistake again. My wallet felt the pain of that simple error. Buying parts takes time and wastes good hard cash. Reading the user guide could have saved me easily. I want to save you from that same sad fate.
The Hard Truth About Paper Filters
Sharing my biggest failure might help you save cash. Cleaning a paper filter seemed somewhat easy to try. Washing the black mold away was my bright plan. I was completely wrong about that terrible idea. Water and paper do not mix well at all.
My Bad Washing Test
Taking the smelly paper piece to my sink was step one. Running warm water over the pleats felt right then. Adding a small drop of dish soap made sense. Scrubbing the paper folds with a brush ruined everything. The sturdy paper turned into gray mush right away.
Fibers tore apart in my wet hands in a flash. The inner structure was destroyed by the tap water. I stood there holding a wet pile of gray trash. My hope of saving it washed down the drain. I had to buy a brand new one right away.
Why Paper Goes in the Trash
Paper parts are highly porous by their specific design. Mold roots grow very deep into these soft fibers. Plain water cannot wash these deep roots out ever. Adding water just melts the thin paper core fast. Wet paper filters always belong in the garbage trash.
Seeing mold on paper means the bitter end. Saving it is basically impossible for anyone to do. Putting the dirty piece in a sealed bag is wise. Tying the bag tight stops the spores from flying. Tossing it in your outside bin is the final step.
How I Clean Washable Foam Filters
My other floor vacuum uses a washable foam insert. Dense foam handles water very well without breaking down. Cleaning this soft sponge is actually quite safe. Using a simple washing method works great for me. Sharing my exact steps might save your foam today.
Taking the Mess Outside
Cleaning a moldy sponge inside the house is bad. Spreading spores around your kitchen causes much more trouble. Carrying the dust bin outside to the yard is smarter. Fresh air makes the dirty job feel much nicer. Wearing a basic face mask protects my lungs well.
Putting on cheap rubber gloves keeps my hands clean. Breathing in nasty dust is never a fun time. I like to stand near my garden hose outside. The sunlight helps me see all the hidden dirt. Working in the yard keeps my home air safe.
Shaking Off Loose Dust
Tapping the foam against a large tree trunk works. Hitting it against a trash can does the job perfectly. A huge cloud of gray dust falls down fast. Doing this gently protects the soft foam structure well. Ripping the sponge is easy if you pull hard.
Tapping continues until no dry dust remains inside it. Removing this loose dirt makes the wet washing easier. I spend a good five minutes just shaking it. Getting the loose dirt out saves time later on. My lungs thank me for wearing that dust mask.
The Magic White Vinegar Soak
Bleach was my old choice for killing gross mold. Hating that harsh smell made me stop entirely. Finding a better natural way took some free time. Plain white vinegar is my top choice cleaner now. Vinegar costs very little at the local grocery store.
Killing deep mold roots is what acid vinegar does. It breaks down the bad stuff without harsh fumes. My hands do not burn when I use it. The sour smell fades away very fast in the sun. It is a very safe choice for home use.
Mixing the Cleaning Fluid
Grabbing a small plastic bucket starts the soak process. Pouring in two cups of white vinegar comes next. Adding two cups of warm tap water dilutes it. Mixing the clear liquid blends it together very nicely. Dropping the foam filter into the bucket covers it.
Pushing it down ensures the liquid soaks deep inside. Leaving it alone for thirty minutes does the trick. Vinegar easily breaks down the mold and bad smells. I go drink some hot tea while I wait. Taking a break makes the chore feel much faster.
| Cleaning Product | Kills Mold Roots | Leaves a Smell | Safe for Foam |
| White Vinegar | Yes | Fades fast | Yes |
| Liquid Bleach | No | Very harsh | No |
| Mild Dish Soap | No | Very pleasant | Yes |
| Baking Soda | Mildly | No smell | Yes |
Rinsing and Waiting for Dry Foam
Waiting thirty minutes feels like a very long time. Pulling the foam out of the bucket reveals a smell. It smells a bit like a sour salad dressing. Walking over to the garden hose is my next move. Turning the water on gently prevents a huge splash.
Washing Away the Gross Grime
Rinsing the foam under cool water is quite gross. Dark brown water flows straight out of the sponge. Watching the dirt wash away brings a lot of joy. Rinsing continues until the water runs totally clear. I make sure to check every single deep fold.
Squeezing the foam very gently removes the heavy water. Twisting the sponge hard is a terrible idea always. Forceful twists will tear the soft foam right apart. Pressing it flat between my hands works the best. I try to get as much water out as possible.
The Most Crucial Drying Step
Messing up the drying process was my old habit. Putting a damp sponge back into the vacuum fails. Doing this is a massive cleaning mistake every time. Damp filters will grow fresh mold in two days. You will end up right back where you started.
Placing the clean foam on a dry towel is better. Finding a sunny spot on my porch helps a lot. Letting it sit there for two days is mandatory. Forty eight hours is the magic number for drying. The foam must feel bone dry before you vacuum.
Rushing this step ruins all your hard washing work. Patience is the real secret to a fresh appliance. I test the thickest part with my dry thumb. If it feels cool or damp at all, I wait. Waiting an extra day is better than growing mold.
How I Stop Wet Messes Now
Changing my daily cleaning habits became a top priority. That gross mold event taught me a lesson well. Doing a few simple things keeps my vacuum dry. I want to share these easy tips with you. They will save you time and save you money.
Emptying the Dirt Bin Fast
Emptying the dust bin happens after every single chore. Leaving dirt sitting inside the machine is plain lazy. Dirt holds onto tiny drops of moisture from air. Emptying the bin lets fresh air flow through it. The plastic stays clean and smells very fresh now.
I knock the loose dust out into the trash. Wiping the plastic sides with a dry cloth helps. Doing this takes just two extra minutes of time. The clear bin looks brand new when I finish. It is a very good habit to start today.
Changing My Storage Spot
Storing my vacuum in the dark closet stopped completely. That tiny room was far too damp for tools. Keeping the machine in the corner of my room helps. The air feels much drier in the open space. Good air flow keeps the plastic casing smelling nice.
Dark tight spaces are a bad place for vacuums. The motor needs to cool down after hard work. A sunny dry room is the best choice always. My whole house smells better since I made the change. Little choices make a very big difference for homes.
Signs You Need a New Filter
Saving a dirty filter is not always possible today. Washable ones wear out eventually after heavy daily use. Fine dust clogs the tiny pores deeply over time. Watching for three clear warning signs tells me things. These signs mean it is time to buy new.
The Bad Smell Stays
Washing a foam piece perfectly sometimes fails for me. Soaking it in vinegar might not work at all. Drying it in the hot sun changes absolutely nothing. Putting it back in the machine brings pure sad tears. Turning the power on reveals that same sour smell.
Mold is likely trapped deep inside the dense core. Washing will not help this sad situation anymore today. Throwing the piece in the trash is the safe choice. Breathing bad air is not worth saving ten dollars. Your health is much more important than a sponge.
A Big Loss of Suction
Noticing a drop in suction power is a huge clue. Passing over the same dirty spot three times annoys. Hearing the motor run louder than normal means trouble. Feeling heat radiating from the plastic casing is bad. The filter is completely choked with heavy packed dirt.
Air cannot pass through the dense foam block properly. The motor works too hard and gets very hot. Buying a new filter fixes this annoying problem instantly. The machine runs quiet and pulls dirt up fast. It feels like having a brand new vacuum cleaner.
Dark Stains That Stay
Clean foam filters should look fairly bright and fresh. Mine usually start off light gray or pure white. Seeing dark black patches that resist washing is bad. Those stubborn stains are actually dead toxic mold groups. The physical material is compromised at this point now.
Throwing these stained filters away keeps my home safe. I never risk keeping a stained sponge in my house. New parts are cheap when you buy them online. Getting a fresh one feels like a great reward. Your lungs will thank you for the clean air.
| Condition of Filter | Action to Take | The Reason Why |
| Paper with dark spots | Throw in trash | Cannot be washed ever |
| Foam with mild odor | Wash with vinegar | Easily cleaned at home |
| Foam with deep stains | Throw in trash | Material is fully ruined |
| Paper older than six months | Replace with new | Clogged with hidden dirt |
| Foam older than one year | Replace with new | Pores are totally blocked |
Final Thoughts on Clean Air
Dealing with a stinky vacuum is incredibly frustrating daily. Bad smells ruin the whole point of cleaning homes. Removing dirt is the main goal of the job. Blowing mold spores around the house defeats the purpose. I hate feeling like my chores made things worse.
Spending time learning these hard lessons was quite painful. Ruining that pricey paper piece was a silly mistake. Leaving a damp foam filter in a closet hurt. My personal stories might save you from those choices. I truly hope my bad luck helps you out.
Taking good care of your home tools is smart. Using plain white vinegar and warm sunshine works wonders. Reading your machine user guide first is always great. Checking if your filter is paper or foam helps. That one tiny detail changes the whole cleaning game.
Keeping your parts clean makes them last much longer. Good habits save money and keep the air fresh. I feel happy when my house smells very clean. My family breathes easy without sneezing all day long. A clean filter is the secret to happy homes.
Frequently Asked Questions
Q: Can I wash a DeWalt paper shop vac filter?
A: No, standard paper shop vac filters will fall apart if you wash them. Water ruins the thin paper fibers and lets mold grow in a hot garage. You must buy a new one.
Q: How do I clean my Makita washable foam vacuum filter?
A: You can safely wash foam tool filters with a mix of white vinegar and water. Rinse it fully and let it air dry for two full days before using your wet/dry vac again.
Q: Why does my wet/dry shop vac smell like a wet dog?
A: That gross sour smell means toxic mold is growing deep inside your vacuum filter. Sucking up wet messes with a dry dust filter traps water, causing mold to grow fast.
Q: Will a moldy shop vac filter hurt my suction power?
A: Yes, heavy mold and thick dust will block the air flow right away. Your shop vac motor will run very hot and lose power until you change the dirty filter out.
Q: How often should I replace my garage vacuum filters?
A: You should swap out disposable paper tool filters every three to six months. Washable foam filters for your shop vac can last a full year if you keep them dry.