How to Knead Bread Dough Using a Kitchen Blender
I love fresh-baked goods. Baking is a big part of my day. My sourdough starter is like a hungry pet. I feed it every single morning. Sometimes, life gets very busy. Just last Tuesday, it was raining hard here in Alabama. My kid was running around the house. They wanted a fresh loaf for a snack. I was short on time and needed a quick way to mix flour and water.
I glanced at my heavy metal blender and wondered if it was the right tool for the job. Could I use it for this chore? Yes, you can. You can quickly learn how to knead bread dough in a machine. It is wild how fast the blades work. You save so much arm effort. The final results are still great. Let me share what I learned from my personal kitchen tests.
Picking the Right Flour
You cannot make great bread with bad flour. The type of wheat matters a lot. I buy good bags from the local shop. Cheap flour gives you flat and sad loaves. Bread flour is the best choice. It has high protein inside. This creates strong gluten webs.
Strong webs trap the air inside the loaf. This action gives your loaf a nice, tall rise. All-purpose flour works fine, too. Your baked bread will just be a bit softer. Do not use cake flour for this job. It lacks the strength needed to hold shape. Whole wheat is very healthy for your body. But it makes the crumb quite heavy.
I like to mix half white and half wheat. This blend gives a deep flavor. The inner texture stays light and airy.
Flour Types and Uses
Here is a quick guide to my favorite options.
| Flour Type | Protein Level | Best Used For |
| Bread Flour | High | Artisan loaves, bagels |
| All Purpose | Medium | Sandwich bread, rolls |
| Whole Wheat | High | Hearty rustic loaves |
| 00 Flour | Medium | Thin crust pizza |
Why Water Temp Matters
Water is a huge part of the mix. The heat level is very important for success. Cold water slows down the yeast growth. Hot water will kill it entirely. You want warm water for the bowl. It should feel like a nice warm bath. Test a few drops on your wrist first. If it burns, let it cool down quickly.
In the summer, my kitchen gets very warm. The humidity here is no joke at all. The air stays thick and sticky. I actually use cooler tap water then. The room heat helps the yeast grow fast. During winter, I use warmer liquid. You must always adapt to your exact space. The mix responds to the room conditions around it. This is why baking feels like an art.
The Magic of Active Yeast
Yeast is a tiny living bug. It eats up sugar and raw flour. Then it breathes out gas bubbles. This trapped gas makes the mass puff up. I mostly use my natural wild starter. But active dry packets are great too. Instant yeast is even faster for busy days. You just throw it right into the dry bowl.
If using active dry, you must wake it up first. Put the grains in a warm liquid bath. Add a tiny pinch of white sugar. Wait about five to ten minutes. It should get bubbly and smell like a brewery. Throw it out if it stays fully flat. Dead yeast means flat and dense bricks. Always test your jar before starting a big bake.
What is Dough Hydration?
Bakers talk about hydration a lot. It sounds like a fancy science term. It simply means the total water content. Wet mixes are very hard to handle. But they make the best crispy crusts. Dry mixes are very easy to shape quickly. Sadly, the baked slice can be dry and dense.
I prefer a slightly sticky mix. It takes real practice to manage the mess. Use a plastic scraper to help move it. Try not to add too much raw flour. A little stickiness is your friend. As you work the ball, the wetness fades away. The dry grains drink the water over time. Have some patience during this messy phase. Let the chemistry work its quiet magic.
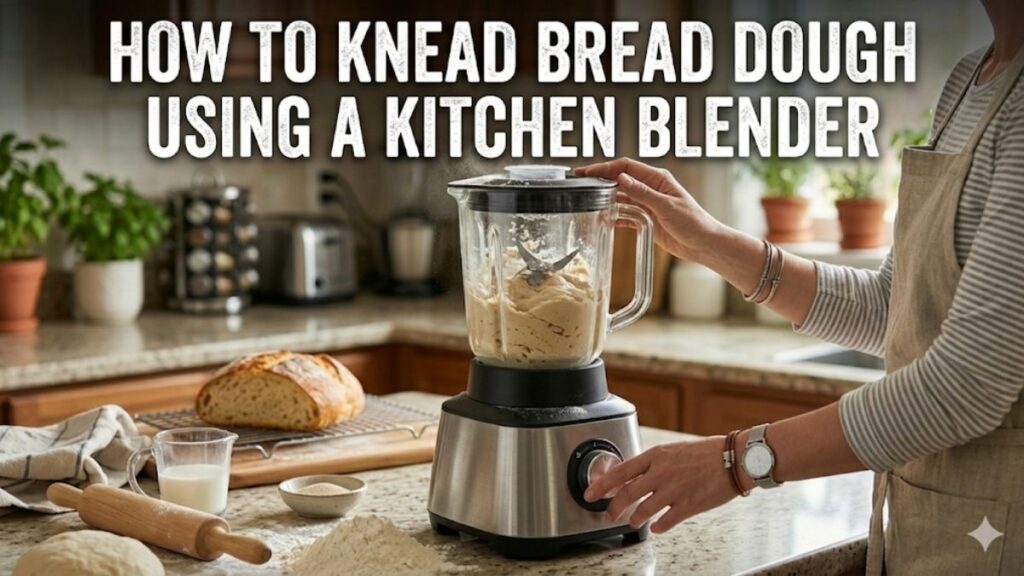
Why Use a Kitchen Blender?
We all want quick and easy results. A kitchen blender spins at high speeds. The metal blades make intense heat and friction. This action builds up gluten very fast. Gluten is what gives the crust its chewy bite. It is the real secret to a proper crumb.
You just add your dry items first. Pulse the dial a few short times. Then slowly pour in the warm liquid. Run the motor on a medium setting. Stop after forty seconds of active spinning. Never run it too long. The motor heat will cook your delicate yeast. That is a very bad thing. I ruined a test batch once by walking away. The ball got way too hot. Keep a close eye on the spinning blades. I prefer gear built with strong metal parts. Cheap plastic gears break under this heavy load.
Making Magic with a Food Processor
A glass blender is super helpful. A wide food processor is honestly even better. It has a nice flat work bowl. The chopping blades are razor sharp. It chops the dry and wet parts together. This creates a strong network in mere seconds.
Many pros use this exact trick for daily prep. Attach the standard metal chopping blade. Toss the dry goods in first. Pulse them briefly to blend everything. Turn the power switch to the steady on position. Slowly pour the wet liquid down the feed tube. A tight ball will form very rapidly. Turn the machine off the second it gathers together. The same heat warning applies here too. Friction remains your biggest enemy if you ignore the clock.
Kneading Dough in Stand Mixer
Many home cooks own a heavy mixer. Kneading dough in stand mixer bowls is very common. It is my usual choice for giant weekend batches. First, secure the heavy metal hook piece. Drop all your measured items into the bowl. Flip the power switch to a low speed.
The heavy machine does all the hard work. You can wipe down the counters while it chugs along. It works much gentler than a fast blender. The mixture does not overheat during the process. This gentle action is a huge benefit. I stand back and watch it slap the metal sides. The rhythmic slapping sound is very nice. That noise means the stretch is forming properly. I wait until the bowl looks mostly clean. The sticky mass should pull away from the walls fully. Add a tiny dusting of flour if it sticks.
How to Knead Dough by Hand
Sometimes you just want to feel the food. Learning how to knead dough by hand is very rewarding. You use your own arm strength and body weight. It connects you deeply with the baking steps. I find it to be great stress relief.
First, wipe down a large space on your counter. Scatter a very light layer of powder down. Dump your shaggy wet mess right in the middle. Your fingers will get very gummy at first. Do not panic and grab more powder right away. Just keep your hands moving in a steady rhythm. Push the mass forward with your palm heel. Fold the top half back over itself. Give the whole thing a small quarter turn. Push it firmly down again.
You will feel the texture change under your hands. It always starts out rough and shaggy. It tears apart very easily at the start. After ten long minutes, it feels soft and smooth. It bounces back right away when you poke it. I really love the smell of the wet wheat. My kid loves to help with this messy step. We always make a huge mess in the kitchen. Flour gets tracked all over the entire floor. The fun memories make the cleanup totally worth it.
How to Knead Pizza Dough
Friday night is pizza night in my house. Knowing how to knead pizza dough requires a different touch. Pizza bases need a massive amount of stretch. You want the circle thin, strong, and crispy. We use special Italian flour for this exact task. It contains way more protein inside. More protein equals more stretch and chew.
Pizza recipes usually contain olive oil. The golden oil makes the final crust very tender. You work it just like standard white bread. But you want the surface fully smooth and tight. Sometimes the ball fights back during the shaping phase. It shrinks back when you try to pull it wide. That tension means the structure is too tight. The easy fix needs zero effort. Toss a damp kitchen towel over the bowl. Walk away into the next room for fifteen minutes. The short rest lets everything relax nicely. Then it will stretch out nicely without snapping back.
How Long to Knead Dough?
Beginner bakers always ask me this exact question. How long to knead dough before stopping? Time limits are honestly just a rough guess. You really must look closely at the texture. Each physical tool needs a completely different amount of time. A spinning motor works very fast. Human hands are naturally much slower.
As you mix and knead to dough perfection, watch the clock. I made a simple cheat sheet to guide you.
Time Guide by Method
| Mixing Method | Average Time Needed | Biggest Risk or Danger |
| Food Processor | 45 Seconds | Cooking the yeast |
| Kitchen Blender | 40 Seconds | Motor burnout |
| Stand Mixer | 8 Minutes | Overworking the strands |
| By Hand | 15 Minutes | Tired arms and shoulders |
Let us review the famous windowpane test. This is my exact favorite kitchen trick. Pinch off a tiny piece from the main ball. Roll it briefly into a small round marble. Use both thumbs to stretch it out slowly. You want to pull it paper thin. Hold the stretched piece up to a bright light. Can you clearly see light shining through it? Does the thin sheet stay in one solid piece? If the answer is yes, you are fully done. If the sheet rips right away, you need more time. Never skip this easy visual test. It tells you the full truth every single time.
Final Thoughts on Baking
Making bread at home is a fun journey. It takes some trial and error to get it right. I have baked plenty of flat bricks over the years. Even now in 2026, I still mess up sometimes. You learn something new from every single mistake. Do not get sad if your first loaf fails. Just try a different mixing method next time.
Your kitchen might prefer the blender trick. Or maybe you love the quiet rhythm of hand mixing. Discover what fits your exact daily schedule best. Fresh warm bread brings the whole family together quickly. The amazing smell alone is worth the effort.
Frequently Asked Questions About Kneading Tools
Can I use a standard blender for kneading dough?
Yes, but only for very short bursts. High speed blades create heat that might kill your yeast. Stick to heavy metal blenders to protect your internal gears from the thick dough.
Will kneading dough damage my stand mixer’s motor?
Thick dough puts a heavy load on any motor. Always use the lowest speed setting on your stand mixer to prevent overheating. This simple habit keeps your gears safe for years.
Why is my food processor getting so hot?
Rapid spinning causes high friction between the blades and the flour. This heat can ruin your yeast and the final rise. Limit your run time to under sixty seconds to stay safe.
Do I need a special hook for my mixer?
You should always use a dedicated metal dough hook. It pulls and stretches the mass just like human hands. The wrong attachment puts too much stress on the tool’s motor and arm.
Can cold garage storage hurt my kitchen tools?
Cold air can make internal lubricants thick and sluggish. Bring your tool into a warm room for an hour before use. This ensures the motor spins smoothly without any extra strain.